


18-56
Cisco Prime Network 4.0 User Guide
OL-29343-01
Chapter 18 Monitoring MPLS Services
Configuring MPLS-TP
Locking/Unlocking MPLS-TP Tunnels in Bulk
An MPLS-TP network has one or multiple LSPs running between endpoint devices. If you want to
shutdown one of the interfaces in the network, the MPLS-TP packet must be diverted through an
alternative LSP. This can be achieved by locking the interface.
The MPLS-TP bulk lockout/unlock option in Prime Network allows you to lock or unlock multiple
MPLS-TP tunnels on different VNEs at the same time.
Before attempting to lock or unlock a tunnel, ensure that MPLS-TP tunnels have been configured for the
link. Also, ensure that you have the appropriate rights (Configurator and above) to lock or unlock a
tunnel.
Locking MPLS-TP Tunnels
To lock MPLS-TP tunnels in bulk:
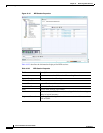
Step 1 In the map view, right-click the required link and choose Properties.
Step 2 In the link properties window, right-click on the required physical link and choose the Show MPLS-TP
tunnels option. The MPLS-TP tunnels’ commands dialog box is displayed, which lists all the tunnels in
the selected link.
Step 3 In the MPLS-TP tunnels’ commands dialog box, choose the tunnels that you want to lock and select the
Lock Out option in the Commands field.
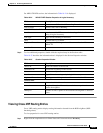
Step 4 Click Execute Now. You are prompted to confirm the lockout operation.
Step 5 Click Yes to confirm. A message is displayed confirming that the selected tunnels have been locked. The
status of the tunnel is automatically updated as Lockout(UP) after this operation.
Unlocking MPLS-TP Tunnels
To unlock MPLS-TP tunnels in bulk:
Step 1 In the map view, right-click the required link and choose Properties.
Step 2 In the link properties window, right-click on the required physical link and choose the Show MPLS-TP
tunnels option. The MPLS-TP tunnels’ commands dialog box is displayed, which lists all the tunnels in
the selected link.
Step 3 In the MPLS-TP tunnels’ commands dialog box, select the locked tunnels that you want to unlock and
select the Unlock option in the Commands field.
Step 4 Click Execute Now. You are prompted to confirm the unlock operation.
Step 5 Click Yes to confirm. A message is displayed confirming that the selected tunnels have been unlocked.
The status of the tunnels is automatically updated as Active(UP) after this operation.
Note If you attempt to unlock a tunnel that is not locked, a message is displayed indicating that there are no
valid tunnels to perform the unlock operation.