


3-16
Cisco Prime Network 4.0 User Guide
OL-29343-01
Chapter 3 Viewing and Managing NE Properties
Checking VNE Connectivity and Communication Status
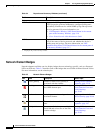
When displaying network and provisioning events, Prime Network Vision monitors the history size value
defined in the Events tab of the Options dialog box (Tools > Options > Events). The default value is six
hours and can be changed in Prime Network Administration. In addition, Prime Network Vision limits
the maximum number of network and provisioning events that are sent from the server to client to 15,000
each. If the number of network or provisioning events exceeds the limit specified in the Options Events
tab or the 15,000 maximum limit, Prime Network Vision purges the oldest events from table. The
purging mechanism runs once per minute.
Tip You can display or hide the ticket and events pane by clicking the arrows displayed below the device
view panel.
Checking VNE Connectivity and Communication Status
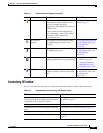
Virtual Network Elements (VNEs) are the Prime Network entities that simulate managed devices. Each
VNE is assigned to manage a single network element instance and is designated by the NE name and
IP address.
VNEs are created using the Prime Network Administration GUI client. After a VNE is created and
started, Prime Network investigates the network element and automatically builds a live model of it
including its physical and logical inventory, configuration, and status. As different VNEs build their
model, a complete model of the network is created.
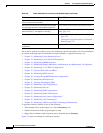
For the most part, VNE operations are hidden from Prime Network Vision GUI client users because those
users are interested in devices, not these back-end processes. But VNEs must have connectivity to a
device in order to maintain the NE model. To provide connectivity and polling information, you can view
VNE properties from the device inventory:
• VNE Status to view the VNE Properties window. This window provides details such as the VNE’s
protocol and polling settings and other configuration information. See VNE Properties Window
(VNE Status Button in the content pane of the Inventory Window), page 3-16.
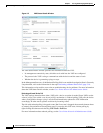
• VNE Details to view more details about device and VNE connectivity. See VNE Communication
Status (VNE Details Button in the content pane of the Inventory Window), page 3-17.
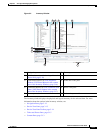
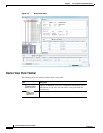
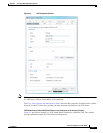
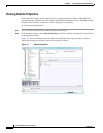
VNE Properties Window (VNE Status Button in the content pane of the Inventory Window)
Figure 3-4 provides an example of a VNE properties window. This VNE is modeling a Cisco 3620 router.