


10-42
Cisco Prime Network 4.0 User Guide
OL-29343-01
Chapter 10 Working with Reports
Managing Reports
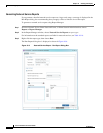
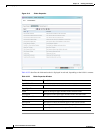
Step 3 In the Edit dialog box, enter a new name for the report type in the Report Name field, using the following
conventions:
• The name can contain 1 to 150 characters.
• The name cannot include the following characters: ;?<>/:\"#*|.
Step 4 Click OK.
The navigation pane is refreshed and the report type is displayed with the new name.
Renaming a Generated Report
To rename a report:
Step 1 Choose Reports > Report Manager.
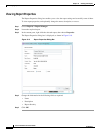
Step 2 In the content pane, right-click the report that you want to rename, then choose Rename or Properties.
Step 3 In the Name field, enter the new name for the report, using the following conventions:
• The name can contain 1 to 150 characters.
• The name cannot include the following characters: ;?<>/:\"#*|.
Step 4 Click OK.
The content pane is refreshed and the report is displayed with the new name.
Sharing Reports
Prime Network enables you to share reports that you generate with other users, or limit access to a report
to only you and the administrator.
Note You can share reports with others only if sharing is enabled in Prime Network Administration. For more
information, see the Cisco Prime Network 4.0 Administrator Guide.
Sharing a Report
To share access to a report that you generated:
Step 1 Choose Reports > Report Manager.
Step 2 Locate the required report.
Step 3 In the content pane, right-click the report that you want to share, then choose Share.
The report is available to all system users for viewing and using.