


18-22
Cisco Prime Network 4.0 User Guide
OL-29343-01
Chapter 18 Monitoring MPLS Services
Managing VPNs
For more information about loading the newly created VPN in the service view map, see Adding a VPN
to a Map, page 18-22.
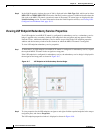
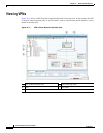
Adding a VPN to a Map
You can add a VPN to a map view if the VPN was previously created by a user or discovered by Prime
Network Vision and are not currently displayed in the map.
Note Adding a VPN affects other users if they are working with the same map.
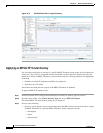
To add an existing VPN to a map:
Step 1 In Prime Network Vision, display the map to which you want to add the VPN.
Step 2 Do either of the following:
• From the File menu, choose Add to Map > VPN > Existing.
• In the main toolbar, click Add to Map, then choose Add to Map > VPN > Existing.
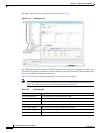
The Add VPN dialog box is displayed.
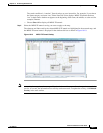
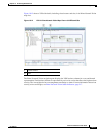
Step 3 Do either of the following:
• Choose a search category, enter a search string, then click Go to narrow search results to a range of
VPNs or a specific VPN. Search categories include:
–
Description
–
Name
The search condition is “contains.” Search strings are case-insensitive. For example, if you choose
the Name category and enter “net,” Prime Network Vision displays VPNs that have “net” in their
names whether at the beginning of the name, the middle, or the end.
• Choose Show All to display all the VPNs.
Step 4 Select the VPN that you want to add to the map.
Tip Press Shift or Ctrl to choose multiple adjoining or nonadjoining VPNs.
Step 5 Click OK.
The VPN is displayed in the navigation pane and the selected map or subnetwork in the Prime Network
Vision window content pane. In addition, any tickets are displayed in the ticket area.