


18-5
Cisco Prime Network 4.0 User Guide
OL-29343-01
Chapter 18 Monitoring MPLS Services
Working with MPLS-TP Tunnels
Adding an MPLS-TP Tunnel
Prime Network Vision automatically discovers MPLS-TP tunnels, endpoints, and midpoints and enables
you to add MPLP-TP tunnels to maps.
To add an MPLS-TP tunnel to a map:
Step 1 In Prime Network Vision, display the map to which you want to add the MPLS-TP tunnel.
Step 2 Do either of the following:
• From the File menu, choose Add to Map > MPLS-TP Tunnel.
• In the main toolbar, click Add to Map, then choose Add to Map > MPLS-TP Tunnel.
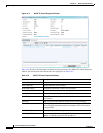
The Add MPLS-TP Tunnel dialog box is displayed.
Step 3 Do either of the following:
• Choose a search category, enter a search string, then click Go to narrow search results to a range of
MPLS-TP tunnels or a specific MPLS-TP tunnel. Search categories include:
–
Description
–
Name
–
System Name
• Choose Show All to display all the MPLS-TP tunnels.
Step 4 Select the MPLS-TP tunnel that you want to add to the map.
Step 5 Click OK.
The MPLS-TP tunnel is added to the map and to the navigation pane.
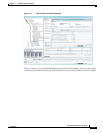
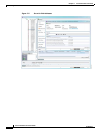
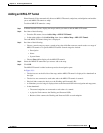
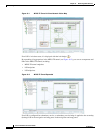
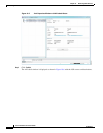
In Figure 18-1:
• The devices are on the left side of the map, and the MPLS-TP tunnel is displayed in a thumbnail on
the right.
• The devices are connected to each other and to the MPLS-TP tunnel via tunnels.
• Physical links connect the devices to the Working and Protected LSPs.
• A redundancy service badge is displayed next to the Protected LSP in the navigation and map panes.
• In the thumbnail:
–
The tunnel endpoints are connected to each other via a tunnel.
–
A physical link connects the Working and Protected LSPs.
–
Business links connect the Working and Protected LSPs to each endpoint.