


18-21
Cisco Prime Network 4.0 User Guide
OL-29343-01
Chapter 18 Monitoring MPLS Services
Managing VPNs
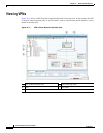
Managing VPNs
The following topics describe:
• Creating a VPN, page 18-21
• Adding a VPN to a Map, page 18-22
• Removing a VPN from a Map, page 18-23
• Moving a Virtual Router Between VPNs, page 18-23
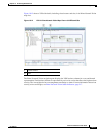
Creating a VPN
You can change business configurations by manually creating VPNs. The VPNs that are manually
created do not contain virtual routers and sites.
To create a VPN:
Step 1 In the Prime Network Vision navigation pane, select the map root.
Step 2 From the File menu, choose Add to Map > VPN > New.
Step 3 In the Create VPN dialog box, enter the following:
• Name—A unique name for the new VPN.
Note VPN business element names are case sensitive.
• Icon—To use a custom icon for the VPN, click the button next to the Icon field and navigate to the
icon file.
Note If a path is not specified to an icon, the default VPN icon is used (for more information about
icons, see Table 18-6 on page 18-20).
• Description—(Optional) An additional VPN description.
Step 4 Click OK.
The new VPN is added to the VPN list in the Add VPN dialog box.
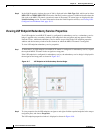
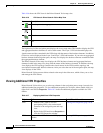
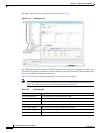
Site Double-click a site to view the IP Interface
Properties window
Viewing Site Properties, page 18-27
Link Double-click a link to view the link properties
window. The properties that are depend on the
link type.
Chapter 6, “Working with Links”
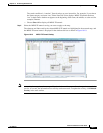
Table 18-7 Displaying Additional VPN Properties (continued)
Object Option For Additional Information