


Send documentation comments to mdsfeedback-doc@cisco.com.
32-2
Cisco MDS 9000 Family Fabric Manager Configuration Guide
OL-6965-03, Cisco MDS SAN-OS Release 2.x
Chapter 32 Network Monitoring
SAN Discovery and Topology Mapping
information such as zones, VSANs, and ISLs exceeding utilization thresholds. The topology map also
provides a visual context for launching command-line interface (CLI) sessions, configuring
PortChannels, and opening device managers.
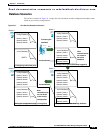
Using the Topology Map
The Fabric Manager topology map can be customized to provide a view into the fabric that varies from
showing all switches, end devices, and links, to showing only the core switches with single bold lines
for any multiple links between switches. Use the icons along the left side of the topology map to control
these views or right-click anywhere in the topology map to access the map controls.
You can zoom in or out on the topology map to see an overview of the SAN or focus on an area of
importance. You can also open an overview window that shows the entire fabric. From this window, you
can right-click and draw a box around the area you want to view in the main topology map view.
Another way to limit the scope of the topology display is to select a fabric or VSAN from the Logical
Domains pane. The topology map displays only that fabric or VSAN.
Moving the mouse pointer over a link or switch provides a simple summary of that SAN component,
along with a status indication. Right-clicking on the component brings up a pop-up menu. You can view
the component in detail or access configuration or test features for that component.
Double-click a link to bring link status and configuration information to the information pane.
Double-click a switch to bring up Device Manager for that switch.
Saving a Customized Topology Map Layout
Changes made to the topology map can be saved so that the customized view is available any time you
open the Fabric Manager client for that fabric.
To save the customized layout in Fabric Manager, follow these steps:
Step 1 Choose File > Preferences to open the Fabric Manager preferences dialog box.
Step 2 Click the Map tab and check the Automatically Save Layout check box to save any changes to the
topology map.
Step 3 Click Apply to save this change, or click Close to discard any unsaved changes and close the dialog box.
Using Enclosures with Fabric Manager Topology Maps
Because not all devices are capable of responding to FC-GS-3 requests, different ports of a single server
or storage subsystem may be displayed as individual end devices on the topology map. See the
“Modifying Device Grouping” section on page 3-15 to group these ports into a single enclosure for
Fabric Manager.
The Alias->Enclosure button displays in the Information pane for hosts and storage elements. This
button acts as a shortcut to naming enclosures. To use this shortcut, you highlight each row in the host
or storage table that you want grouped in an enclosure and then click Alias -> Enclosure. This
automatically sets the enclosure names of each selected row with the first token of the alias.