


Send documentation comments to mdsfeedback-doc@cisco.com.
8-5
Cisco MDS 9000 Family Fabric Manager Configuration Guide
OL-6965-03, Cisco MDS SAN-OS Release 2.x
Chapter 8 Cisco Traffic Analyzer
Using Cisco Traffic Analyzer with Fabric Manager Web Services
Where database_directory is the directory where you want Cisco Traffic Analyzer to save its database
files (for example, /var/ntop).
Note If another application uses port 3000, you can change the port that Cisco Traffic Analyzer uses by
entering the following in Step 3:
ntop.exe /c -P tmp -w port_number where port_number is equal to the port that you want Cisco Traffic
Analyzer to use. Set the port number to 3001 if you want to use SSL. Fabric Manager Web Services can
only detect Cisco Traffic Analyzer if you use port 3000 (the default port).
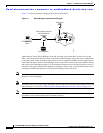
Step 4 Verify that the Fibre Channel port on the PAA-2 is connected to the SD port on the switch (Figure 8-1).
Step 5 Verify that the Ethernet port on the PAA-2 is connected to the workstation running Cisco Traffic
Analyzer.
Step 6 Click Interfaces > SPAN... in Device Manager to configure SPAN on the required switch ports.
Step 7 Click Interfaces > SPAN... in Device Manager to verify that the Fibre Channel port connected to the
PAA-2 is configured as an SD port. The port mode of the destination interface must be SD.
Step 8 Click the Sessions tab in Device Manager to verify the correct destination and source of traffic (ingress).
Caution Cisco Traffic Analyzer must not be used with the PAA-2 in Management mode (MNM). Refer to the
Cisco MDS 9000 Family Port Analyzer Adapter 2 Installation and Configuration Note.
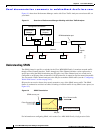
Under Windows, you can use the \tmp directory provided with the distribution to store the Cisco Traffic
Analyzer database.
To install and launch Cisco Traffic Analyzer on a Windows workstation, follow these steps:
Step 1 Open a browser and go to the following website to access the web page where Cisco Traffic Analyzer is
available:
http://cisco.com/cgi-bin/tablebuild.pl/mds-fm.
Step 2 Download ntop-win32.zip and save it on your workstation.
Step 3 Unzip the downloaded file.
Note You need the WinPcap version 3.1 or later library file to use Cisco Traffic Analyzer on a
Microsoft Windows system. You can download this file from the Cisco CD that shipped with
your product, or from the following website:
http://winpcap.polito.it/.
Step 4 Open a command prompt and change directories to your ntop installation directory.
Step 5 Enter ntop.exe /c -P database_directory or install ntop as a service on Windows by following these steps:
a. Enter ntop /i to install ntop as a service.
b. Choose Start > Programs > Administrative Tools > Services to access the Windows Services
Panel.
c. Right-click ntop and choose properties. You see the Properties dialog box.