


Send documentation comments to mdsfeedback-doc@cisco.com.
16-10
Cisco MDS 9000 Family Fabric Manager Configuration Guide
OL-6965-03, Cisco MDS SAN-OS Release 2.x
Chapter 16 Inter-VSAN Routing Configuration
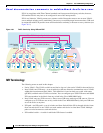
Modifying IVR
Step 1 Select All VSANs > IVR from the Logical Domains pane. You see the IVR configuration in the
Information pane.
Step 2 Select the Default Fabric ID tab to display the existing default AFIDs.
Step 3 Click the Create Row icon to create a default AFID. You see the default AFID dialog box.
Step 4 Check the switch check box for each switch involved in IVR that you want to use this default AFID.
Step 5 Set the SwitchWWN and set the default Fabric ID for this entry.
Step 6 Click Create to create this entry or click Cancel to discard all changes.
Step 7 Repeat Step 1 through Step 6 for all switches and default AFIDs you want to configure in your IVR
topology.
To configure individual AFIDs using Fabric Manager, follow these steps:
Step 1 Select All VSANs > IVR from the Logical Domains pane. You see the IVR configuration in the
Information pane.
Step 2 Select the Fabric ID tab to display the existing AFIDs.
Step 3 Click the Create Row icon to create an AFID. You see the AFID dialog box.
Step 4 Check the switch check box for each switch involved in IVR that you want to use this default AFID.
Step 5 Set the SwitchWWN and set the Fabric ID for this entry.
Step 6 Enter a comma-separated list of VSAN IDs in the VSAN List text box.
Step 7 Click Create to create this entry or click Cancel to discard all changes.
Step 8 Repeat Step 1 through Step 6 for all switches and AFIDs you want to configure in your IVR topology.
Enabling IVR Without NAT
To enable IVR without IVR in NAT mode from Fabric Manager, follow these steps:
Step 1 Select All VSANs > IVR from the Logical Domains pane. You see the IVR configuration in the
Information pane.
Step 2 Select the CFS tab if CFS is enabled for this feature in the fabric.
Step 3 Select enable from the Enable/Admin column for the primary switch.
Step 4 Select the Apply Changes button from the Information pane to distribute this change to all switches in
the fabric, or select the Undo Changes button to cancel any changes you made.
Step 5 If CFS is not enabled, select the Control tab if it is not already displayed to enable IVR individually for
each switch.
Step 6 Set the command drop-down menu to enable for each switch you want to enable IVR on.
Step 7 Select the Apply Changes button from the Information pane to enable IVR on the switches, or select the
Undo Changes button to cancel any changes you made.
Step 8 Click CFS > Config Changes > Action and choose commit.