


Video Viewer Virtual media sessions
59
590-590-609A
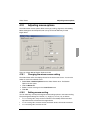
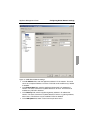
4.14.3.2 Mapping virtual media drives
Open a virtual media session from the Video Viewer toolbar by selecting Tools -
Virtual Media.
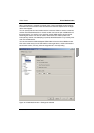
To map a physical drive as a virtual media drive, complete the following steps:
a. In the Virtual Media window, select the Mapped check box next to the drive or
drives you want to map.
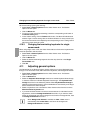
b. If you want to limit the mapped drive to read-only access, select the Read Only
check box next to the drive prior to mapping the drive. If the virtual media
session settings were previously configured so that all mapped drives must be
read-only, this check box is already enabled and cannot be changed.
You might want to select the Read Only check box if the session settings
enabled read and write access, but you want to limit the access of a particular
drive to read-only.
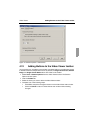
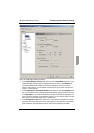
To add and map an ISO or diskette image as a virtual media drive, complete the
following steps:
a. In the Virtual Media window, click Add Image.
b. The Common File Chooser window opens, with the directory containing disk
image files (ending in .iso or .img) visible. Select an ISO or diskette image file
and click Open.
c. The file header is checked to make sure it is correct. If it is, the Common File
Chooser window closes and the chosen image file opens in the Virtual Media
window, where it can be mapped by selecting the Mapped check box.
d. Repeat steps a through c for any additional ISO or diskette images you want to
add. You can add any number of image files (up to the limits imposed by
memory), but you can only have one virtual CD or virtual mass storage
mapped concurrently.
If you attempt to map too many drives (one CD and one mass storage device) or
too many drives of a particular type (more than one CD or mass storage device), a
message is displayed. If you still want to map a new drive, you must first unmap an
existing mapped drive, then map the new drive.
After a physical drive or image is mapped, it can be used on the target device.
4.14.3.3 Unmapping a virtual media drive
Eject the mapped drive from the target device.
Clear the Mapped check box.
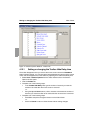
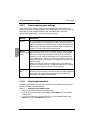
4.14.3.4 Displaying virtual media drive details
In the Virtual Media window, click Details. The window expands to display the
Details table. Each row indicates:
• Target Drive - Name used for the mapped drive, such as Virtual CD 1.
• Mapped to - Identical to Drive information listed in the Client View Drive
column.
• Read Bytes and Write Bytes - Amount of data transferred since the mapping.
• Duration - Elapsed time since the drive was mapped.
To close the Details view, click Details again.