


Installing System Components 123
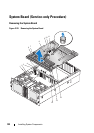
CAUTION: Exercise care when removing the system board to prevent damage to
cables, connectors, and components.
1
Ensure power is removed.
2
Disconnect any USB, VGA, and serial connections on the back of the
chassis.
3
Remove the top cover. See "Removing the Top Cover" on page 60.
4
Remove the cooling shroud. See "Removing the Cooling Shroud" on
page 76.
5
Remove the processor heat sinks. See "Removing a Processor Heat Sink" on
page 101.
6
Remove the SAS controller card. See "Removing a SAS Controller Card"
on page 80.
7
Remove the RAID battery. See "Removing a RAID Battery" on page 85.
8
Disconnect the Intrusion switch from the system board at J1H1.
9
Remove the memory risers. See "Removing a Memory Riser" on page 96.
10
Remove all PCI Express cards. See "PCI Express Add-in Cards" on page 86.
11
Remove the I/O Riser. See "Removing the I/O Riser" on page 110.
12
Remove the back fans and fan housings. See "System Fans" on page 70.
13
Disconnect SATA_A from the system board at J3E2.
14
Remove the SATA_A cable from the center brace channel.
15
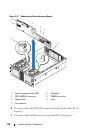
Slide the center brace locks toward the back of the chassis to unlock the
center brace, then lift the center brace out of the chassis.
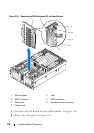
1 Intrusion switch 2 SAS backplane
3 Center brace 4 Center brace channel
5 Center brace lock 6 Heat sink retention bracket
7 ZIF lever 8 System board
9 SATA_A connector 10 SATA_B connector
11 Blue plunger 12 CONTROL PANEL connector
13 SIGNAL connector 14 PWR DIST CONN connectors (2)