


104 Installing System Components
5
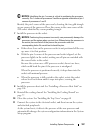
If the processor heat sink has not separated from the processor, carefully
rotate the processor heat sink in a clockwise, then counterclockwise,
direction until it releases from the processor. Do not pry the processor heat
sink off of the processor.
NOTICE: If you are going to reinstall the same processor and processor heat
sink, ensure that you do not disturb the thermal grease on either the
processor or the processor heat sink.
6
Lift the processor heat sink off of the processor and set the processor heat
sink upside down so as not to contaminate the thermal grease.
Installing a Processor Heat Sink
NOTE: New processor heat sinks have Thermal Interface Material (TIM) pre-
applied. If installing a new processor heat sink, ignore step 1 and step 2 below.
1
Using a clean lint-free cloth, remove the existing thermal grease from the
processor heat sink.
2
Apply thermal grease evenly to the top of the processor while taking care
not to use excessive amounts of grease, which could leak out the sides and
cause damage to the processor when the heat sink is secured.
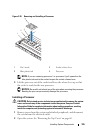
3
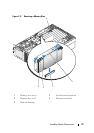
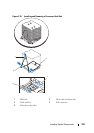
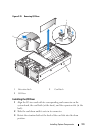
Place the processor heat sink onto the processor. See Figure 3-20.
4
Squeeze the sides of the heat-sink retention clip together and press down
on the blue tab. When the lower corners of the clip fit into the slots in the
socket, release the sides of the clip to lock the processor heat sink in place.
See Figure 3-19.
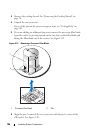
Removing a Processor
1
Remove the processor heat sink. See "Removing a Processor Heat Sink" on
page 101.
2
Pull the socket-release lever straight up until the processor is released from
the socket. See Figure 3-20.