


Installing System Components 107
NOTICE: Identifying the pin-1 corners is critical to positioning the processor
correctly. Pin-1 corners of processors 3 and 4 are opposite orientation of pin-1
corners of processors 1 and 2.
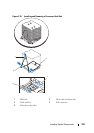
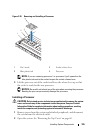
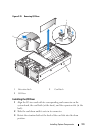
Identify the pin-1 corner of the processor by locating the tiny gold triangle
on one corner of the processor. Place this corner in the same corner of the
ZIF socket identified by a corresponding triangle.
7
Install the processor in the socket.
NOTICE: Positioning the processor incorrectly can permanently damage the
processor and the system when you turn it on. When placing the processor in
the socket, be sure that all of the pins on the processor enter the
corresponding holes. Be careful not to bend the pins.
a
If the release lever on the processor socket is not positioned all the way
up, move it to that position.
b
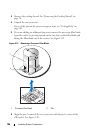
With the pin-1 corners of the processor and socket aligned, set the
processor lightly in the socket, making sure all pins are matched with
the correct holes in the socket.
Because the system uses a ZIF processor socket, do not use force,
which could bend the pins if the processor is misaligned.
When the processor is positioned correctly, it drops down into the
socket with minimal pressure.
c
When the processor is fully seated in the socket, rotate the socket
release lever back down until it snaps into place, securing the
processor.
8
Install the processor heat sink. See "Installing a Processor Heat Sink" on
page 104.
9
Reinstall the cooling shroud. See "Installing the Cooling Shroud" on
page 77.
10
Close the system. See "Installing the Top Cover" on page 60
11
Connect the system to the electrical outlet, and then turn on the system
and attached peripherals.
As the system boots, it detects the presence of the new processor and
automatically changes the system configuration information in the System
Setup program.