


Installing System Components 101
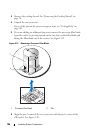
Removing Memory Modules
CAUTION: Use extreme care when removing DIMMs. Too much pressure can
damage the connector. Apply only enough pressure on the plastic levers to release
the DIMM.
1
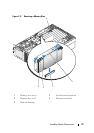
Remove the Memory Riser Cover. See "Removing the Memory Riser
Cover" on page 99.
2
Open the plastic levers on each end of the DIMM socket(s). The DIMM
will lift from the socket.
3
Hold the DIMM only by the edges. Do not touch the DIMM components
or the gold edge connectors. Store it in an antistatic bag.
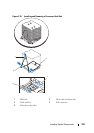
4
Line up the hooks in the memory riser cover with the notches on the
bottom edge of the memory riser.
5
Lift the memory riser cover over the DIMMs and let the cover latch snap
into place.
6
Install the memory riser. See "Installing a Memory Riser" on page 98.
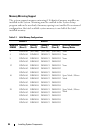
Processors
The system requires 1, 2, or four processors—a 3-processor configuration is
not supported.
Processors must be installed from right to left, i.e., processor 1, then processor
2, then processors 3 and 4.
Each processor and its associated internal cache memory are contained in a
pin grid array (PGA) package that is installed in a ZIF socket on the system
board.
Your system comes with processors with the same model, stepping, core
frequency, and cache size.
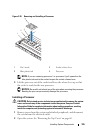
Removing a Processor Heat Sink
CAUTION: Only trained service technicians are authorized to remove the system
cover and access any of the components inside the system. See your Product
Information Guide for complete information about safety precautions, working
inside the computer, and protecting against electrostatic discharge.
1
Remove power from the system and attached peripherals, and disconnect
the system from the electrical outlet.