


NDA-30122 Revision 1
Page 83
Attendant Console Statistics Operations Manual ROUTE GROUPS
Route Groups (Cont.)
Printing a Route
Group
This procedure will print an existing route group. Follow the steps to print a route
group:
Step 1:
From the Console Stats Main Menu (Figure 7-1), select the Route
Groups option and press Enter. The Route Groups screen (Figure 7-2)
will be displayed.
Step 2:
At the Route Groups screen, use the UP and DOWN arrow keys to
highlight to select the route group to print and press Enter.
- More than one route group can be selected. Highlight each desired route
group to print and press Enter. Continue this to select any additional
route groups to print.
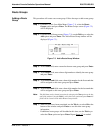
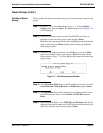
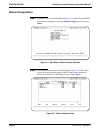
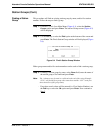
Step 3:
With the route groups(s) selected, use the Tab key to select the Print
option at the bottom of the screen and press Enter. The Print a Route
Group window (Figure 7-7) will be displayed showing the selected route
group to print.
Figure 7-7 Print Route Groups Window
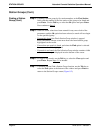
Step 4:
At the Records to Print field, use the UP and Down arrow keys to select
Current Record, Marked Records, or All Records and press Enter.
Step 5:
The Destination field specifies how the report will be printed. Use the
UP and Down arrow keys to select Printer or UNIX File and press
Enter.
Step 6:
If the Destination field is set to UNIX File, the File Name field will be
displayed. Enter the file name of the UNIX file that will be created by the
print of the selected report format and press Enter.