


NDA-30122 Revision 1
Page 75
Attendant Console Statistics Operations Manual ROUTE GROUPS
Route Groups
Adding a Route
Group
This procedure will create a new route group. Follow the steps to add a route group:
Step 1:
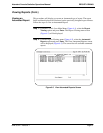
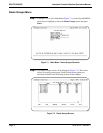
From the Console Stats Main Menu (Figure 7-1), select the Route
Groups option and press Enter. The Route Groups screen (Figure 7-2)
will be displayed
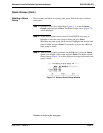
Step 2:
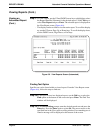
From the Route Groups screen (Figure 7-2), use the Tab key to select the
Add option and press Enter. The Add a Route Group window will be
displayed (Figure 7-3).
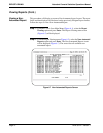
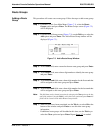
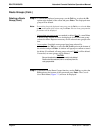
Figure 7-3 Add a Route Group Window
Step 3:
At the Name field, enter a name for the new route group and press Enter.
Step 4:
At the Route Field, enter a three-digit number to identify the route group
and press Enter.
Step 5:
At the First Trunk field, enter a three-digit number for the first trunk that
will be assigned to this route group and press Enter.
Step 6:
At the Last Trunk field, enter a three-digit number for the last trunk that
will be assigned to this route group and press Enter.
Note:
The field data can be cleared at anytime by selecting the
Clear
option at the bot-
tom of the window. Using the
Tab
key, select the Clear option and press
Enter
. All
fields will be cleared on the Add a Route Group window.
Step 7:
When all fields have been completed, use the Tab key to select Ok at the
bottom of the window and press Enter to save this new route group
information.
- If additional route groups will be added at this time, use the Tab key to
select the Clear option and press Enter. Repeat Steps 3-7
as needed.