


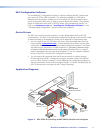

4. Wire and connect the MLC power supply (see “Connecting Power to the MLC,”
later in this section). Connect all other power cords and turn on all the devices,
including the MLC.
5. Connect a configuration cable from the computer to the MLC by doing either of the
following:
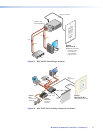
• Connect a USB A to mini B cable to the MLC USB conguration port and to a USB
port on your computer (see “Configuring the MLC via the USB Port,” later in
this section).
• Connect an RS-232 cable to the provided 3-pole connector and connect it
between the MLC Host/Cong port and the computer serial port (see “Wiring
the Host/Config Port,” later in this section).
6. Download and install the MLC Configuration Program (see “Installing the
Configuration Software,” in the “Software-based Configuration” section).
7. Download or create drivers for the devices you will be connecting (see “Obtaining
Device Drivers” or “Configuring Using IR Learning” in the “Software-based
Configuration” section).
8. Configure the MLC buttons and ports using the configuration program. (See the
configuration program help file for these procedures. To access the help file, see
“Installing the Configuration Software” in the “Software Configuration and
Control” section.)
If you are configuring via the USB port, remove the USB cable when you are finished.
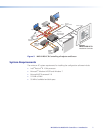
9. Test the system: press the MLC buttons, watch the display, and listen to the audio
output to determine whether the connected devices are responding correctly
(powering on and off, switching inputs, and so forth). If not, ensure all devices are
plugged in and receiving power. Check the cabling and make needed adjustments.
10. Disconnect power from the MLC at the source and from all other devices in the
system.
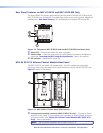
11. Mount the MLC to the mounting surface, following the appropriate procedure for
your MLC model, discussed later in this section:
• For MLC 62 D models, see “Mounting the MLC 62 D.”
• For MLC 62 RS EU and MK models, see “Mounting the MLC 62 RS EU and the
MLC 62 RS MK.”
• For the MLC 64, see “Mounting the MLC 64 RS VC D.”
12. Restore power to the MLC and to the connected devices.
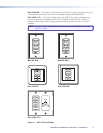
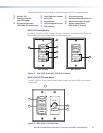
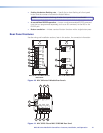
Front and Left Side Panels
MLC D Front Panels
The front panels of the MLC 62 RS D, the MLC 62 IR D, and MLC 64 models contain
buttons and indicators that are visible and accessible after the MLC has been mounted.
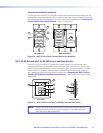
Other front panel controls and connectors are located behind the MLC wallplate and are
not visible after mounting (see “Controls behind the wallplate,” later in this section).
MLC 60 Series MediaLink Controllers • Features, Installation, and Operation 9