


60 Troubleshooting
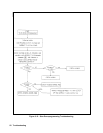
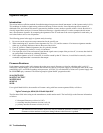
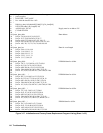
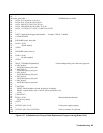
Figure 3-16. Signature Analysis Connections, (Sheet 2 of 2)
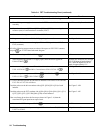
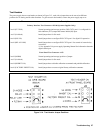
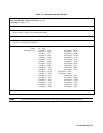
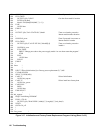
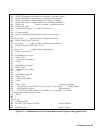
Table 3-6. Front Panel SA Test
Description: These signatures check front panel microprocessor AlU3.
Valid A1U4 ROM Firmware Revision: A.01.07
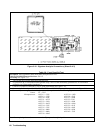
Test Setup: See Figure 3-17.
1 .Turn off the power supply and remove the top cover.
2. To gain access to A1 Front Panel Board, perform steps 1 and 2 of the disassembly procedure for A1 Front Panel
Assembly (see "Disassembly Procedures").
3. Connect SA jumper of connector J3 on A1 Front Panel Board (see Figure 3-15).
4. Connect signature analyzer CLOCK, START, STOP, and GROUND inputs and setup as shown in Figure 3-16.
5. Turn on the power supply and use the signature analyzer probe to take the following signatures:
Power: 5V = 3395
Microprocessor: AlU3-15 = 3395 A1U3-29 = 1029
AlU3-19 = 552U AlU3-30 = 0295
AlU3-20 = 954C AlU3-31 = 0000
AlU3-21 = A552 AlU3-32= 3395
AlU3-22 = 2954 AlU3-33 = 0008
AlU3-23 = 0A55 AlU3-34 = 040A
AlU3-24 = 3395 AlU3-35 = 0102
AlU3-25 = 3395 AlU3-38 = 0002
AlU3-26 = 0000 AlU3-39 = 0020
AlU3-27 = 0000 AlU3-42 = 3395
AlU3-28 = 40A5
6. After completing the tests, be sure to return the J3 jumper to its original position.