


40
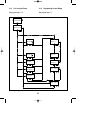
2 MICROPHONES
2.1 Main menu selection
Select from the main menu by means of the
left/right arrow keys:
MICROPHONES.
2.2 Microphone number selection
Pressing ENTER will show the number of
the first microphone found in the system.
The system can detect the presence of the
Microphone Input Module, but not whether
a microphone is connected to that
Microphone Input Module. So it is, in
principle, possible to program microphones
on an Microphone Input Module even if
those microphones are not present. Another
microphone number can be selected using
the up/down arrow keys.
2.3 Priority level selection
The display will show the current priority.
Changing the priority level can be done with
the up/down arrow keys.
Level 1 is the lowest; level 9 is the highest
priority. See chapter ‘System Operation’ for
description of the priority function.
2.4 Signal number selection
This is the attention or alarm signal that
either precedes a call, or may be used alone.
Signals are selectable using the up/down
arrow keys. Double up/down arrow keys
change the tens, and single up/down arrow
keys change the single numbers. Signal
number “00” means: no signal. If the
selected signal number does not exist the
display shows:
* NOT EXISTING *
SIGNAL: XX
2.5 Pre-recorded message number
selection
This display will be skipped if the Re-corded
Message Module is not present.
Message number can be selected using the
up/down arrow keys.
The sequence of message number selection
on the display is:
0, 1, 2, 3, 4, 1 REPEAT, 2 REPEAT, 3
REPEAT, 4 REPEAT.
“MESSAGE: 0” means: no message.
Pressing BREAK will return to ‘priority level
selection’.
See chapter ‘Recorded Message Module’ for
a full explanation, and details of how to
record messages.
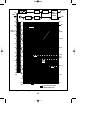
2.6 Call Routing to Zones
The current programmed call routing will be
displayed. On the display, zones which are
already selected are indicated by 1, non-
selected zones are indicated by 0.
The lower right of the display will show the
zone number which is being indicated by
the cursor.
Moving the cursor to a different zone can be
done with the left/right arrow keys. Shifting
the cursor to the right, further than the last
position, will display the routing of zones 7-
12, if Zone Relay Module 2 is present.
Shifting the cursor to the right again, further
than the last position, will display the
routing of zones 13-18, if Zone Relay
Module 3 is present.
If only Zone Relay Modules 1 and 3 are
present, the routing of zones 13-18 will be
displayed instead of 7-12.
Selecting a zone can be done with the ‘|’ key.
Deselecting a zone can be done with the ‘O’
key. Pressing BREAK will continue with
programming the control relays.
GB/SM 30 user manual 5/26/98 10:18 AM Page 40