


SentinelRAID 170 Installation and Hardware Reference Manual
2-6 Battery Backup Unit (BBU) Installation
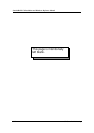
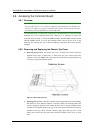
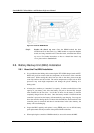
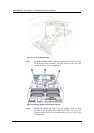
Figure 2-2: Install the DIMM Module
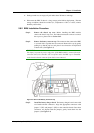
Step 3. Replace the chassis top cover. Once the DIMM module has been
installed and if no other items (e.g., BBU module or expansion daughter
board) are being installed on the controller board, reinstalled the chassis
top cover. For further instructions on how to reinstall the chassis top
cover, please refer to Section 2.6.2.
2.8. Battery Backup Unit (BBU) Installation
2.8.1 About the First BBU Installation
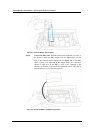
♦ It is possible that the linking cable connecting the IFT-9070D charger board and IFT-
9010D cell pack has contact with the components on the surface of the controller
main board. While routing this cable from one side to the other, please note that
some chip surfaces must be avoided. The surface temperature on chips such as SCSI
processors may reach high temperatures and damage the plastic shielding on a
linking cable.
♦ A battery has a tendency to "remember" its capacity. In order to make full use of the
capacity of your battery cells, allow the battery cell pack to become fully charged
when installed for the first time. It will take 24 hours for the battery to become
completely charged for the first time. Once the battery module is installed and the
controller is powered on, the battery will automatically start charging. Do not power
down the controller during the first 24 hours after the BBU has been installed. If the
controller power is turned off and there is unwritten data in the cache memory, the
battery will start discharging.
♦ Inspect the BBU regularly and replace it every TWO years; use an official battery
pack replacement and only use them with specified RAID controllers.
♦ When replacing the controller’s DIMM module, be sure to disconnect the BBU.