


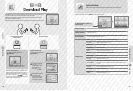


Adjusting System Settings
84
Adjusting System Settings
85
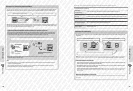
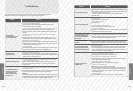
When contrast levels are low When objects appear in the foreground
Other Settings
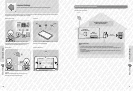
Exposing the Nintendo 3DS XL system to shocks or placing it in hot environments when using the outer cameras can result in poorly focused
3D images. For the best results when using the cameras, follow the steps below.
Note: Incorrectly calibrating the cameras can lead to these problems worsening. Recalibrate the cameras whenever necessary.
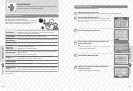
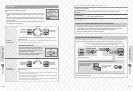
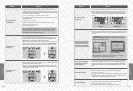
Taking care not to have anything in the foreground, choose a bright, outdoor object that is over 20 metres from the Nintendo 3DS XL
that lls the screen. Auto-calibration will begin when the three lights
on the upper screen to become lit. Hold the system
steady until the auto-calibration process is complete.
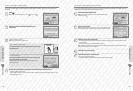
The three lights
on the upper screen may not become lit in the following cases.
Note: There may be other problems in addition to those above that prevent the auto-calibration process from completing. If you
experience problems, try using a dierent object for auto-calibration (for cases where auto-calibration doesn’t complete, you can calibrate
the cameras manually (page 85)).
Note: The auto-calibration process can be completed without taking an ideal photo, but this may result in incorrect calibration. Repeat the
auto-calibration process with a dierent subject if you notice problems with the 3D images.
Outer Cameras
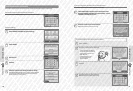
Ensure the 3D depth slider is at the top, then
touch NEXT
Touch AUTOMATIC SETUP
Touch REVERT TO DEFAULT SETTINGS to restore the default settings.
Touch NEXT to take a photo to be used as the basis of the calibration
Over 20 metres
Approx. 25 cm
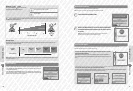
Other Settings
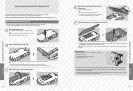
Calibrating the Outer Cameras Manually
Vertical axis issues in the 3D images can be corrected using manual calibration. Use this when automatic calibration doesn’t correct the issues.
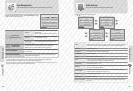
Touch MANUAL SETUP
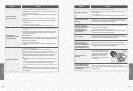
Touch NEXT, then use the L Button or R Button to take a photo of the image you want to
use during the calibration
Note:
t
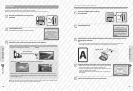
Place the system on a steady surface, with the image you want to take appearing directly in front and in the centre of the screen.
t
Using a simple, yet distinct image like the one shown below, can help the calibration process proceed smoothly.
Adjusting the image on the upper screen to overlap properly
t
Adjustments can be made to the vertical axis. The left and right arrows can be used to
help align the image properly, but these adjustments will not be saved.
t
Even if other objects appearing in the image being used for calibration do not overlap
properly, the calibration process will still work.
t
Images used for calibration that are taken from above or from an angle might not
line up perfectly.
Touch TEST 3D and follow the on-screen instructions
Ensure the 3D depth slider is at the top,
then touch NEXT
1
2
3
1
2
3
4
5