


Clarity User Guide, March 1, 2011 - Rev. 1.06
Page 18
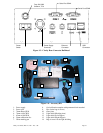
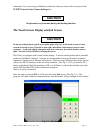
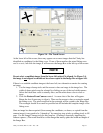
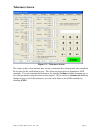
Figure 2.4 – The Teach Screen
At the lower left of the screen, there may appear one or more images that the Clarity has
identified as candidates for the fitting cross. If one of these matches the actual fitting cross
and is on axis, left-click the image; it will move to the Image Box at the left top of the screen.
NOTE
Do not select a candidate image from the lower-left unless if is aligned. In Figure 2.4,
the image is not aligned so should not have been copied to the Image Box at upper left.
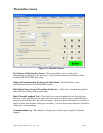
If there is no suitable candidate image at the lower-left, two alternatives remain for creating
an image:
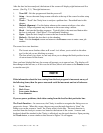
1. Use the image cleanup tools and the mouse to draw an image in the image box. The
width of drawn pixels may be selected by clicking on one of the tool-width squares.
Select the black draw color to actually draw, and the white draw color to clear or
erase.
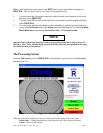
2. Click the Feature From Camera control. A screen shot of the lens will appear.
Rotate the lens if necessary to align it. Then use the mouse to draw a rectangle around
the fitting cross. The pixels enclosed in the rectangle will be copied to the Image Box.
The rectangle should be as small as possible but still include the complete image of the
fitting cross.
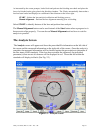
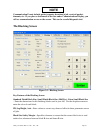
Once an image has been acquired (from among the candidates, or drawn, or copied from the
camera image) it may need to be “cleaned up” by removing stray pixels or adding pixels to fill
gaps. Use the Image Cleanup tools for this purpose. (Cleanup is especially important for
camera captures.) The result should be a clean image that nearly spans the width and height of
the Image Box.