


Clarity User Guide, March 1, 2011 - Rev. 1.06
Page 17
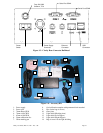
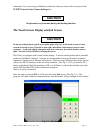
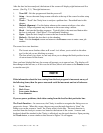
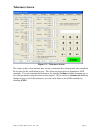
After the lens has been analyzed, the bottom of the screen will display eight buttons and five
arrows. (See Fig. 2.3.) The eight buttons are:
1. Turn Off – Exit the program and shut the power off.
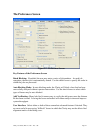
2. Setup – Access the main Setup screen with tabs at the top of the screen for other setup
options.
3. Teach – “Teach” the Clarity how to analyze a problem lens. Described later in this
chapter.
4. Manual Alignment - Use this button whenever the camera misaligns a lens after
analysis. Proper alignment may be drawn on the screen using a mouse.
5. Block – Activate the blocking sequence. Typically this is the most used button after
the lens is analyzed. (See Figure 3.2 for automatic blocking.)
6. Open – Open the lens clamps to remove the lens from the chamber.
7. Recheck – Recheck the lens that is in the chamber.
8. Next – Exit the Analysis screen and return to the Process screen to enter a new job
number.
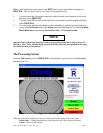
The arrows have two functions:
1. The lowest arrow that has either an R or an L in it allows you to switch to the other
eye for the job you are blocking on screen.
2. The four arrows (up, down, in, and out) allow you to change the block position in case
of cutout issues for the frame.
Once you have blocked the lens, the screen will prompt you to remove lens. The display will
then change to the left lens, or if this was the left lens, then it will return to the Process screen
to start the next job.
NOTE
If the information about the lens coming from the host program is inaccurate on any of
the following items, then the power measured could be inaccurate and out of tolerance.
1. Front Curve
2. Back Curve
3. Lens center thickness
4. Lens diameter
If you see power problems, check data coming from the host for that particular lens.
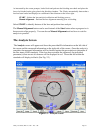
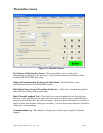
The Teach Function -- In some cases, the Clarity is unable to recognize the fitting cross on
progressive lenses. When this occurs, the user may use the teach function to “draw” the
fitting cross on the screen to “teach” the Clarity what it looks like. The teach function is
accessed from the Analysis screen via a button at the bottom of the screen. A mouse and
keyboard should be attached to the Clarity to effectively use the teach function. Upon pressing
the Teach button, a screen similar to that shown in Figure 2.4 will appear.