


Clarity User Guide, March 1, 2011 - Rev. 1.06
Page 16
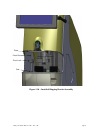
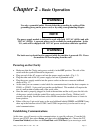
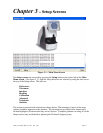
As instructed by the screen prompts, load a block and pad onto the blocking arm chuck and place the
lens to be blocked on the glass plate in the blocking chamber. The Clarity automatically detects that a
lens has been loaded and displays two additional control buttons at the lower right:
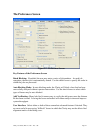
START – Initiate the lens analysis/verification and blocking process.
Manual Alignment – Perform the lens alignment manually prior to blocking.
Select START to identify features of the lens and perform lens analysis.
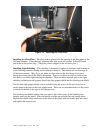
The Manual Alignment button can be used instead of the Start button when a progressive is
known not to align properly. You can choose Manual Alignment and not have to wait for
analysis to proceed.
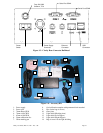
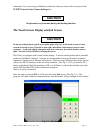
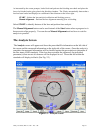
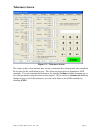
The Analysis Screen
The Analysis screen will appear and show the prescribed Rx information on the left side of
the screen and the measured information on the right side of the screen. Once the analysis is
complete, the measured information will be checked against the prescription to determine if
the lens meets ANSI standards. If the lens does not meet the tolerances, the individual
parameter(s) that are out of tolerance will be displayed in red. Those that fall within the
standards will display in black. (See Fig. 2.3.)
Figure 2.3 – Analysis Screen