


Shift States
The Nostromo Array Programming Software allows you to program three
shift states: red, green and blue. A shift state allows you to add another
layer of programming to each button. You can either set different keys
for each of the shift states, or set one to cycle through all the different
states. This cycle shift gives you the capability to have two extra buttons
for each state. Basically, it frees up six buttons.
• To program shift states, you must choose one button for a cycle shift
command or individual buttons for each of the shift states. In any shift
state, that button will remain a shift button and cannot be remapped
with a function.
• To program a key as a shift button, left-click on the button you would
like to program and select red, green, or blue shift key or “Cycle
Shift”. For the red, green and blue, you can select “Momentary”
or “Toggle”.
• If you select “Momentary”, the shift function will only be in effect
while you hold the button down. If you select “Toggle”, pressing the
shift button will start the programmed shift state and the controller will
remain in that shift state until the shift button is pressed again.
• Once the button is assigned as a shift key, you must go to the
corresponding shift window to assign the functions in that shift state.
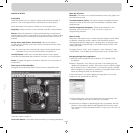
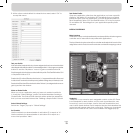
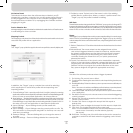
• You can view different shift-state windows by clicking on the red,
green, or blue arrows in the toolbar at the top. You can return to the
original window by clicking on the “SpeedPad” icon.
• Once you are in the different shift-state windows, you can remap
keys, create macros and reprogram axes just as you did in the original
shift state.
• Through use of these shift states, you can quadruple the
programmability of each Nostromo game device. This will also
allow you quick access to many functions during games while
giving you the flexibility of assigning shift keys to any position on
your Nostromo controller.
• Save your work.
Note: It is always a good idea to get into the habit of saving your
profiles by going to “File” and “Save As”. This ensures that when
you modify a profile that is used in a different game for another
purpose, you won’t simply overwrite it. This lets you keep your
different profiles intact.
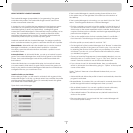
“SIGNING” AND SHARING YOUR PROFILE
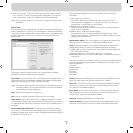
In the “Profile Editor” toolbar, the icon between the question mark and
the “Loadout Manager” icon is the “Contact Info” window. Click on
that to get a window similar to this:
By filling in this window, you get something similar to a name tag for
your profile. You can have the profile identified as yours, including your
comments, e-mail address, etc. for the Nostromo community.
Once your profile is saved and identified, you can submit it to the
Belkin Nostromo team by e-mailing the profile in an e-mail attachment
to nostromoprofiles@belkin.com for inclusion on the Belkin website.
This way, you can have your unique profile and/or loadout file made
available to other users of Nostromo game devices throughout
the world.
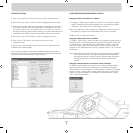
When you are finished creating or editing your profiles, left-click on the
“File” menu on the toolbar and select “Save” or “Save As”. The default
name is “Untitled”. Give it an easily identifiable name (for the next time
you retrieve it) and click “OK”.
Your profile is saved in C:\Program Files\Belkin\Nostromo\Profiles. If you
installed to a directory other than C:\ProgramFiles\Belkin\Nostromo,
then the profile is saved in YourInstallDirectory\Profiles.
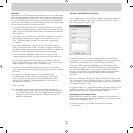
Uploading and Downloading Profiles
Please submit any profiles you create for addition to the profile list at
belkin.com. To submit a profile, please send it as an e-mail attachment
to nostromoprofiles@belkin.com.
To download profiles, go to belkin.com/nostromo and click
on “Downloads”.
Page
6