


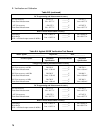


B - Verification and Calibration
78
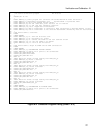
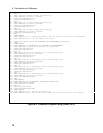
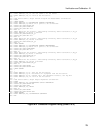
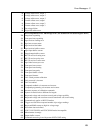
Figure B-2. Calibration Program Listing (Sheet 2 of 3)
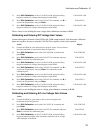
560 OUTPUT @Ac;"CAL:LEV P1"
570 WAIT 10
580 INPUT "Enter DC voltage reading from DVM",Dc_p1
590 PRINT TABXY(25,9),"Point 1 entered"
600 OUTPUT @Ac;"CAL:DATA";Dc_p1
610 OUTPUT @Ac;"CAL:LEV P2"
620 WAIT 10
630 INPUT "Enter DC voltage reading from DVM",Dc_p2
640 PRINT TABXY(25,11),"Point 2 entered"
650 OUTPUT @Ac;"CAL:DATA";Dc_p2
660 OUTPUT @Ac;"CAL:LEV P3"
670 WAIT 10
680 INPUT "Enter DC voltage reading from DVM",Dc_p3
690 PRINT TABXY(25,13),"Point 3 entered"
700 OUTPUT @Ac;"CAL:DATA";Dc_p3
710 WAIT 3
720 CLEAR SCREEN
730 PRINT TABXY(5,10),"1. Connect the 3458A to the rear terminals via the ratio transformer"
740 PRINT TABXY(18,12),"2. Set the 3458A to AC VOLTS"
750 !
760 DISP "Press CONT to begin AC PROGRAMMING and MEASUREMENT calibration"
770 PAUSE
780 CLEAR SCREEN
790 PRINT TABXY(18,5),"CALIBRATING AC POGRAMMING and MEASUREMENT"
800 PRINT TABXY(20,7),"There are 4 points to be calibrated"
810 OUTPUT @Ac;"CAL:VOLT:AC"
820 OUTPUT @Ac;"CAL:LEV P1"
830 WAIT 10
840 INPUT "Enter AC rms ( transformer ratio * DVM reading)",Ac_p1
850 PRINT TABXY(25,9),"Point 1 entered"
860 OUTPUT @Ac;"CAL:DATA";Ac_p1
870 OUTPUT @Ac;"CAL:LEV P2"
880 WAIT 10
890 INPUT "Enter AC rms ( transformer ratio * DVM reading)",Ac_p2
900 PRINT TABXY(25,11),"Point 2 entered"
910 OUTPUT @Ac;"CAL:DATA";Ac_p2
920 OUTPUT @Ac;"CAL:LEV P3"
930 WAIT 10
940 INPUT "Enter AC rms ( transformer ratio * DVM reading)",Ac_p3
950 PRINT TABXY(25,13),"Point 3 entered"
960 OUTPUT @Ac;"CAL:DATA";Ac_p3
970 OUTPUT @Ac;"CAL:LEV P4"
980 WAIT 3
990 INPUT "Enter AC rms ( transformer ratio * DVM reading)",Ac_p4
1000 PRINT TABXY(25,15),"Point 4 entered"
1010 OUTPUT @Ac;"CAL:DATA";Ac_p4
1020 WAIT 10
1030 CLEAR SCREEN
1040 PRINT TABXY(15,10),"CALIBRATING OVERVOLTAGE PROTECTION"
1050 OUTPUT @Ac;"CAL:VOLT:PROT"
1060 PRINT TABXY(30,15),"WAIT"
1070 WAIT 30
1071 OUTPUT @Ac;"CAL:SAVE"
1072 OUTPUT @Ac;"CAL:STATE OFF"
1080 CLEAR SCREEN
1090 PRINT TABXY(15,5),"1. Turn off the AC Source"
1100 PRINT TABXY(15,7),"2. Connect the current shunt and 20 ohm load resistor, see fig.B-1"