


Front Panel Operation - 4
47
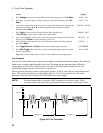
Examples of Front Panel Programming
You will find these examples on the following pages:
1 Setting the output voltage amplitude
2 Setting the output frequency
3 Setting the dc offset
4 Setting a protection feature
5 Clearing a protection feature
6 Generating step, pulse, and list transients
7 Programming trigger delays and phase synchronization
8 Programming slew rates
9 Measuring peak inrush current
10 Setting the GPIB address or RS-232 parameters
11 Saving and recalling operating states
The examples in the ac source Programming Guide are similar to the ones in this section, except that they
use SCPI commands.
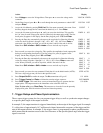
1 - Setting the Output Voltage Amplitude
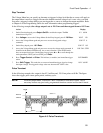
NOTE: The maximum voltage that the ac source can output is limited by the peak value of the
waveform, which is 425 V
peak
. Since the output is programmed in units of rms volts, the
maximum value that can be programmed is dependent on the peak-to-rms ratio of the
selected waveform. For a sinewave, the maximum ac voltage that can be programmed is
300 V
rms
. For other waveforms the maximum may be different.
When you turn on the ac source, the default output shape is a 60 Hz sinewave at 0 Vrms. There is no
output from the ac source because the default output state is OFF, as indicated by the Dis annunciator.
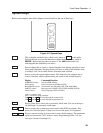
Set the output to 120 V rms as follows:
Action Display
You can set the voltage in any of three ways:
1.
On the Function keypad, press Voltage. On the Entry keypad, press 1 2 0 Enter.
This is the easiest way to enter an accurate value.
VOLT 120
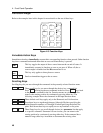
2.
On the Function keypad, press Voltage. On the Entry keypad, press ¯ or ° to
increment or decrement the existing value. This technique is useful when you are
making minor changes to an existing value.
VOLT 127
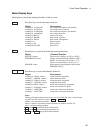
3
Rotate the front panel Voltage knob to obtain 120 V. This method is best when you
want to enter a value without using the voltage menu.
Note: You will not see the new voltage on the front panel meter unless the output is
enabled.
120 V 60 Hz
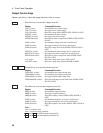
To enable the output:
4.
On the Function keypad, press Output On/Off. The Dis annunciator will go off,
indicating that the voltage is now applied to the output terminals.
120 V 60 Hz