


COPYRIGHT © 2005 MERIT INDUSTRIES, INC.
Site Preparation
In determining the location for your
Megatouch Ion™ video game, consideration
must be given to a suitable, grounded elec-
trical outlet. Since the game is a computer-
ized device, it should have a separate cir-
cuit, if at all possible. If a separate circuit is
not available, care should be taken to pro-
vide a clean and constant voltage. As a
basic guideline, never connect the unit to a
circuit that also supplies power to freezers,
coolers or other high power consuming and
electrical noise generating equipment. Place
the game in a location where nothing will
interfere with proper ventilation. The game
should not be exposed to any dripping or
splashing liquids. Objects filled with liquid
should not be placed on the unit.
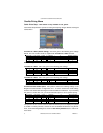
Setting up your Megatouch Game
1. After removing the game from the car-
ton, attach the power cord to the back
of the game near the ON/OFF switch.
Plug the game into a standard AC out-
let.
2. Turn the power switch at the back of
the game to ON and wait for it to go
through its boot-up sequence. The
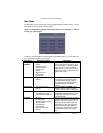
game will display the Main Menu Screen.
3. If you have a Mega-Lease™ game, you
must follow the steps in the MegaNet®
User Manual to connect to the server
in order to activate your game.
4. The machine has been preset at the
factory and therefore should not need
to be adjusted, however it is recom-
mended that the screen be calibrated
(see Screen Calibration) and the coin
or bill acceptor(s) be tested.
5. There are many custom settings avail-
able for the game. To customize the
settings, follow the software instruc-
tions in this manual.
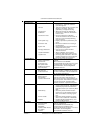
Game Description
The Megatouch EVO model has 2 key-locked
compartments: the CPU section door and the
cash tower section. It comes equipped with
a coin mech and/or bill acceptor. This model
also has couplers installed in the rear of the
game. These are used for future hardware
upgrades which include linking and modem
capabilities. Each game comes equipped
with a wireless USB adapter which can be
used to wirelessly link two Ion games to-
gether by simply turning the games on. With
the addition of a wireless router, up to four
games can be linked and the game(s) can
also connect to the Internet. The Linksys
802.11B router is recommended. For more
information, see Wireless Setup.
The EVO also has several additional wall
mounting kits, including a direct, recessed,
and swivel bracket wall mount. There is
also an available stand on which to place
the game. Contact your distributor to pur-
chase any of these additional parts.
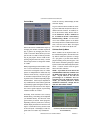
CPU Section
The CPU section is accessible from the front
of the game. The CPU section houses the
LCD monitor, motherboard, I/O board, power
supply, hard drive, and the main harness.
Located on the control board (found inside
the CPU section near the hinge of the CPU
section door) are two internal switches,
SETUP and CALIBRATE (see Figure 24).
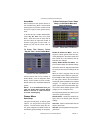
Pressing the SETUP button will bring you to
the Megatouch Setup Screen. See the next
section for calibration instructions.
NOTE: Additional “SETUP” and “CALI-
BRATE” buttons can be accessed
through the back of the CPU section,
by unlocking the cash tower lock (see
Figure 25).
Cash Tower Section
The coin mech/coin box/bill acceptor are ac-
cessible from the rear of the cabinet. The
cash tower is locked for security purposes.
See Figure 25.
1 MEGATOUCH EVO ION OWNER’S MANUAL PM0426-13