


36
Close Combat
Enemy Units Are Always Visible
You use this check box to make sure you can always see enemy units
in the View Area.
To make enemy units always visible
• Click the check box. When a check mark appears in the check box,
this option is enabled.
Enemy Intelligence Always Available
You use this check box to make intelligence concerning the enemy
always available.
To make enemy intelligence always available
• Click the check box. When a check mark appears in the check box,
this option is enabled.
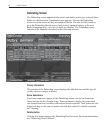
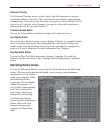
Starting Campaign Play
When you start campaign play, you will either start a new or saved
Campaign. The procedures for starting both new and saved campaigns
assume that you have already started Close Combat and the Command
screen is displayed.
To start a new Campaign
1
On the Command screen, click the Campaign button.
Any saved Campaigns appear in the scrollable list with New
Campaign at the top of the list.
2
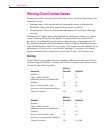
Select the side, number of players, and level of difficulty.
3
In the scrollable list, double-click New Campaign.
The New Campaign Game popup appears.
4
Type your commander’s name, then press TAB.
You can use up to 11 alphanumeric characters for the
commander’s name.
5
Type your Campaign’s name.
You can use up to 31 alphanumeric characters for the
Campaign name.
When you first load Close
Combat, the only Campaign in
the scrollable list is New
Campaign. Campaigns appear
in the scrollable list only after
you’ve saved them.
If you don’t want to see the
Deployment video at the start
of each operation in a Cam-
paign, you can turn the videos
on and off using the Options
menu. If there is a check next
to Videos on the Options menu,
then videos are turned on.