


E-30
Music Presets
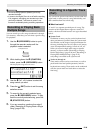
2.
Use the
3
(REW) and
4
(FF) buttons to
move the cursor (2) on the chord progression
editing screen to the step you want to select.
3.
Change the content of the selected step as
desired.
4.
Repeat the above steps to edit all of the steps
you want.
• You can playback the Music Preset you are currently
editing by pressing the
6
(START/STOP) button.
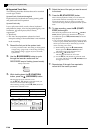
• The table below describes other Music Preset editing
operations you can perform. Press the
bs
(FUNCTION) button, use the
ct
(u) and
dk
(i)
buttons to select the editing operation you want,
perform the required operation, and then press the
dl
(ENTER) button to apply the edit and return to the
chord progression editing screen.
• To exit the editing operation and discard all of your
edits, press the
cs
(EXIT) button.
* The Music Presets in groups B, C, and D are
numbered sequentially, following the numbers in
group A, which start with 001. For details about
sequential numbers, see the “Music Preset List” on
page A-6.
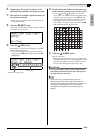
5.
After all editing operations are complete,
press the
cs
(EXIT) button to return to the
editing operation selection screen (page
E-28).
NOTE
• A single preset can contain up to approximately
2,000 chords. If your edits cause the chord limit to be
exceeded, the message “Memory Full” will appear
on the display and further editing will become
impossible.
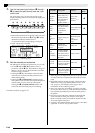
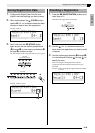
3-1.Select a chord fingering mode and use the
chord keyboard (page E-19) to input chords.
Fingering a chord causes the cursor (2) to
move to the next step automatically.
• If you want to advance to the next step
without changing the current chord, press
the
5
(PAUSE) button.
• If (3) Resolution is shorter than the time up
to the next step, a new step (without chord)
that is equal to the time of the resolution
will be inserted temporarily into the Music
Preset. Fingering a chord for the new step
will cause the step to be registered as part
of the Music Preset, and the cursor will
advance to the next step.* You can use this
operation to insert a new step between the
current and following step.
* Using the
3
(REW) and
4
(FF) buttons to
move the cursor without inputting a chord
will delete the temporarily inserted step.
3-2.Use the
bt
(w, q) buttons to change the
step timing (measure:beat:tick).
Each press of either button changing the
timing in accordance with the resolution.
• The range of values you can specify for the
step timing is limited by the steps before
and after the current step.
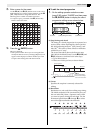
• The timing of the first step (001:1:00) is
fixed and cannot be changed. Also, the final
step is always one measure, regardless of
the resolution.
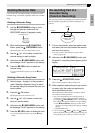
3-3.To delete a step, press both of the
bt
(w and
q) buttons at the same time.
• You cannot delete the first step or the last
step.
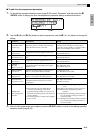
Last step
Editing
Operation
(Display)
Description Operation
1
Initialize
(Initialize)
Initializes all steps.
Initialization is useful
when you want to create
a totally new chord
progression from
scratch.
–
2
Change Key
(Change
Key)
Changes the pitch (key)
of the chords in all of the
steps in semitone units.
Use the
bt
(w, q)
buttons to select the
amount of change
you want (–5 to 6
semitones).
3
Append
Music Preset
(Append
Chords)
Copies all of the steps of
another Music Preset to
the end of the current
Music Preset.
Use the
bt
(w, q)
buttons to select the
number
∗
of the
Music Preset you
want to add.
4
Delete
Measures
(DELETE
Measure)
Deletes a specified
number of measures
from the current cursor
step forward.
Use the
bt
(w, q)
buttons to select the
measures.
5
Insert
Measure
(INSERT
1Measure)
Inserts a blank measure
at the currently selected
step.
–