WPMAN0141 (8/31/01)28
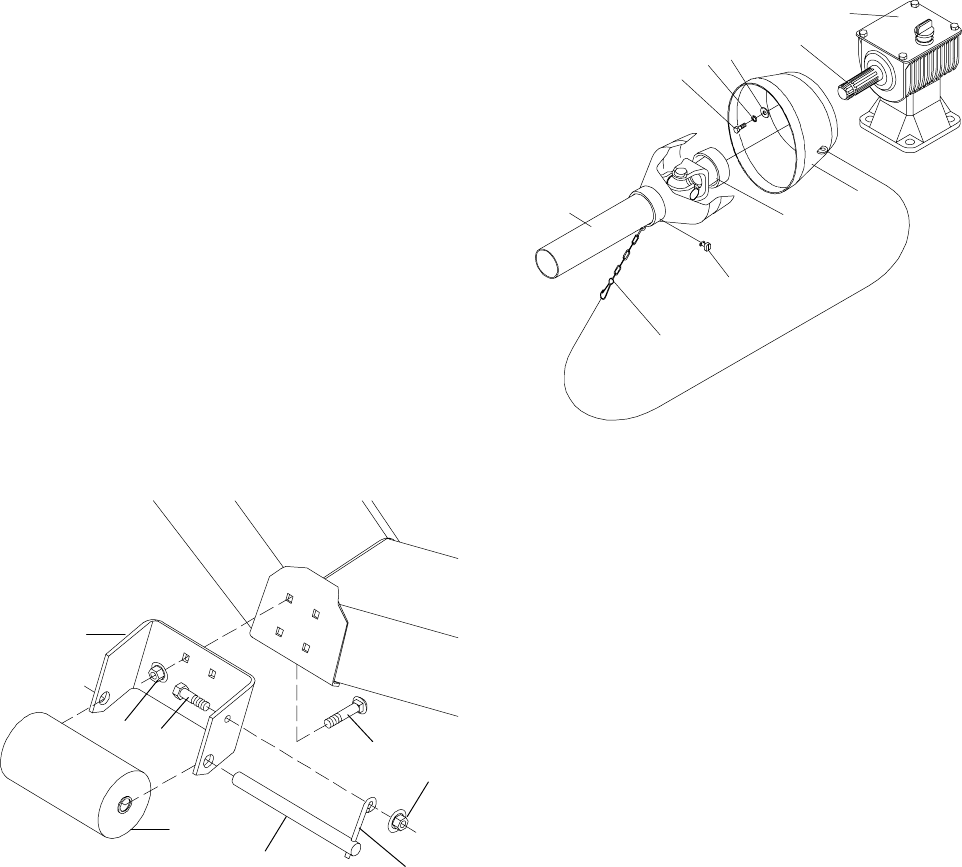
Optional Front Roller Installation
(Figure 24)
Insert four carriage bolts (7) through the front mower
frame from inside out as shown.
Put roller bracket (2) over bolts then install flange
locknuts (5) on bolts and tighten.
Put front roller (1) in roller bracket and insert roller pin
(4) through bracket and roller.
Install retainer pin (3) in roller pin. Put cap screw (6)
through bracket and retainer pin, install flange locknut
(5) and tighten.
CD3552
1
2
5
6
7
5
3
4
1. Front roller
2. Roller bracket
3. Retainer pin
4. Roller pin
5. 3/8 NC Flange locknut
6. 3/8 NC x 1” Hex head cap screw GR5
7. 3/8 NC x 1” Carriage bolt
Figure 24. Optional Front Roller Installation
Driveline Installation (Figure 25)
Slide QD yoke (2) of driveshaft assembly onto
gearbox shaft (6). Make sure QD yoke is seated
securely in groove of gearbox shaft. Attach shield
anti--rotation chain (7) to drive shield as shown.
. Driveline
.QDYoke
.5/16NCx3/4Hex
head cap screw GR5
10
9
8
M5518
7
6
5
4
3
2
1
4. 5/16 Standard flat
washer
5. Counter-cone shield
6. Gearbox input shaft
7. Anti--rotation chain
8. Screw
9. Gearbox
10. 5/16 Lockwasher
Figure 25. Driveline Installation
Front Caster Wheel Installatio n (Figure 26)
Remove lock down nut and move discharge chute up
to mount right front arm. Put arm (12) on deck, insert
cap screws (11 ) through arm and deck, and install
locknuts (13).
Insert carriage bolts (3) through deck and caster arm,
install locknuts (2) and tighten. Tighten locknuts (13)
on cap screws (11).
Move discharge chute to the down position, place
washer on stud and tighten locknut.
Put left front arm (4) on left front end of deck as
shown. Insert five carriage bolts (3) through the frame
and arm and start locknuts (2) on all of them. Tighten
locknuts.
Remove cap screw (14) from caster wheel and yoke
(1) then remove all spacers, washers and spring.
Insert caster wheel and yoke (1) into tube of arms (4
& 12). I nstall all spacers, washers and spring as
shown and tighten cap screw (14). Repeat for
opposite side.
IMPORTANT
J Do not operate tractor and mower until the
caster wheel i nterference check, page 11, h as
been performed. If you change tractors, you must
perform the check for that mounting.
(Rev. 6/6/2002)


