9-10
Cisco Wireless LAN Controller Configuration Guide
OL-9141-03
Chapter 9 Managing User Accounts
Choosing the Web Authentication Login Window
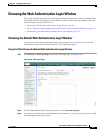
Step 4 If you want to hide the Cisco logo that appears in the top right corner of the default window, choose the
Cisco Logo Hide option. Otherwise, click the Show option.
Step 5 If you want the user to be directed to a particular URL (such as the URL for your company) after login,
enter the desired URL (such as www.AcompanyBC.com) in the Redirect URL After Login field. You
can enter up to 254 characters.
Step 6 If you want to create your own headline on the login window, enter the desired text in the Headline field.
You can enter up to 127 characters. The default headline is “Welcome to the Cisco wireless network.”
Step 7 If you want to create your own message on the login window, enter the desired text in the Message field.
You can enter up to 2047 characters. The default message is “Cisco is pleased to provide the Wireless
LAN infrastructure for your network. Please login and put your air space to work.”
Step 8 Click Apply to commit your changes.
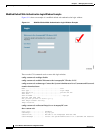
Step 9 Click Preview to view the web authentication login window.
Step 10 If you are satisfied with the content and appearance of the login window, click Save Configuration to
save your changes. Otherwise, repeat any of the previous steps as necessary to achieve your desired
results.
Using the CLI to Choose the Default Web Authentication Login Window
Step 1 To specify the default web authentication type, enter this command:
config custom-web webauth_type internal
Step 2 If you want to use the default web authentication login window as is, go to Step 7. If you want to modify
the default login window, go to Step 3.
Step 3 To show or hide the Cisco logo that appears in the top right corner of the default login window, enter this
command:
config custom-web weblogo {enable | disable}
Step 4 If you want the user to be directed to a particular URL (such as the URL for your company) after login,
enter this command:
config custom-web redirecturl url
You can enter up to 130 characters for the URL. To change the redirect back to the default setting, enter
clear redirecturl.
Step 5 If you want to create your own headline on the login window, enter this command:
config custom-web webtitle title
You can enter up to 130 characters. The default headline is “Welcome to the Cisco wireless network.”
To reset the headline to the default setting, enter clear webtitle.
Step 6 If you want to create your own message on the login window, enter this command:
config custom-web webmessage message
You can enter up to 130 characters. The default message is “Cisco is pleased to provide the Wireless
LAN infrastructure for your network. Please login and put your air space to work.” To reset the message
to the default setting, enter clear webmessage.
Step 7 Enter save config to save your settings.


