


7
GB
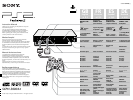
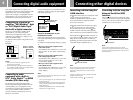
Connection
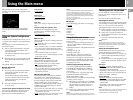
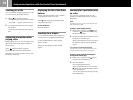
Using the Main menu
When turning on the console without first
inserting a disc, the Main menu appears on the
TV screen.
You can move to the System Configuration
menu or the browser screen from the Main
menu.
Using the System Configuration
menu
Using the System Configuration menu, you can
access the system setup for your PlayStation
®
2
console.
These settings are not cancelled even if you
turn off the console.
1...... Select “System Configuration” using the
up and down directional buttons and
press the ✕ button.
The System Configuration menu appears
on the TV screen.
2...... Select the item you want using the up and
down directional buttons and press the ✕
button.
The default settings are underlined.
x Clock Adjustment
Sets the clock.
1...... Use the up and down directional buttons
to set the day and then press the right
directional button.
Use the same method to set the month,
year, hour, minute and second. To return
to the previous menu, press the left
directional button.
2...... Press the ✕ button in time with an
accurate clock.
You can select optional settings for the clock
Select “Clock Adjustment” using the up and
down directional buttons and press the ¢
button. You can set the optional items.
Time Format
•24 hour clock
•12 hour clock
Date Format
•DD/MM/YYYY
•YYYY/MM/DD
•MM/DD/YYYY
Time Zone
Select your country or region to set the time
zone.
Daylight Savings Time (Summer Time)
Set this item to “Daylight Savings Time
(Summer Time)” when the daylight savings
time is in effect.
•Standard (Winter Time)
•Daylight Savings (Summer Time)
x Screen Size
Selects the display mode according to the TV to
be connected.
•4:3 : select this when you connect a standard
TV to the console.
•Full : select this when you connect a standard
TV to the console. The black margins on the
upper and lower portions of the screen are cut
off.
•16:9 : select this when you connect a
wide-screen TV, or a TV that displays in wide
mode to the console.
x DIGITAL OUT (OPTICAL)
Selects whether to output signal via the
DIGITAL OUT (OPTICAL) connector.
•On : select this when you connect with an
optical digital cable (sold separately).
Normally select this option.
•Off : select this when you do not want sound
signal to be output via the DIGITAL OUT
(OPTICAL) connector.
x Component Video Out
If your TV, monitor or projector has an RGB
input connector or component video input
connectors (Y, CB/PB, CR/PR) that conform to
the output signals of the console, set this item.
When connecting the console using the
supplied AV Cable (integrated audio/video) or
S VIDEO Cable (sold separately), you do not
need to set this item.
•Y Cb/Pb Cr/Pr : select this when you connect
the console to the component video input
connectors on your TV.
•
RGB : select this when you connect the console
to the RGB input connector on your TV.
Note
You can output PlayStation® and PlayStation®2 format
software in either RGB or Y Cb/Pb Cr/Pr format.
However, the PlayStation
®2 console has been designed to
override the “Component Video Out” setting in the
System Configuration menu and output all DVD video
software in Y Cb/Pb Cr/Pr.
The colour is disturbed when you set this item to “RGB”
and play the DVD.
x Language
Selects the language for the on-screen display.
•English
•French
•Spanish
•German
•Italian
•Dutch
•Portuguese
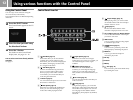
Using the browser screen
You can do the following operations using the
browser screen.
•Checking/copying/deleting game data on a
Memory Card (8MB) (for PlayStation
®
2) or
Memory Card
•Starting PlayStation
®
or PlayStation
®
2 format
software
•Playing an audio CD
•Playing a DVD video
Select “Browser” using the up and down
directional buttons and press the ✕ button.
The browser screen appears on the TV screen.
The Memory Card (8MB) (for PlayStation
®
2),
Memory Card or discs inserted in the console
are displayed as icons.
Checking/copying/deleting game data
You can copy game data from one Memory
Card (8MB) (for PlayStation
®
2) or Memory
Card to another or delete data you no longer
wish to keep.
You cannot, however, copy game data of the
PlayStation
®
2 format software to the
SCPH-1020 E Memory Card.
Insert the Memory Card (8MB) (for PlayStation
®
2)
or Memory Card in advance.
1...... Select the icon of the Memory Card (8MB)
(for PlayStation
®
2) or Memory Card where
the game data you want to check/copy/
delete is saved, and then press the ✕
button.
2...... Check/copy/delete game data according
to the instructions on the screen.
Note
While copying or deleting game data, do not remove the
Memory Card (8MB) (for PlayStation
®2) or Memory Card.
Checking version information
You can check the version of the console,
browser, CD player, PlayStation
®
Driver and
DVD player.
Press the ¢ button in the Main menu.
Auto-diagnosis function
The PlayStation
®
2 console automatically adjusts
console settings for best possible disc playback.
However, you can also manually start the
auto-diagnosis feature whenever necessary.
1......Select “Console” using the up and down
directional buttons and press the ¢ button.
2......Select “On” using the up and down
directional buttons and press the ✕ button.
3......Insert a disc.
The console automatically starts the
diagnosis.
Note
The diagnosis setting automatically returns to “Off”
(default setting) when you press the 1/RESET button or
start playing a PlayStation
® format disc, PlayStation®2
format disc or a DVD video disc.
Setting the PlayStation
®
Driver
The PlayStation
®
Driver is a programme for
loading PlayStation
®
format software.
1......Select “PlayStation
®
Driver” using the up
and down directional buttons and press
the ¢ button.
2......Select the item you want using the up and
down directional buttons and press the ✕
button.
Disc Speed
•Standard : normally select this position.
•Fast : loading time for a PlayStation
®
format
software disc can be shortened.
Depending on the software, there may be no
effect or the software may unexpectedly fail.
In this case, select “Standard.”
Texture Mapping
•Standard : normally select this position.
•Smooth : you can make the display smoother
when playing certain PlayStation
®
format
software titles.
Depending on the software, there may be no
effect. In this case, select “Standard.”
Note
The “PlayStation
®
Driver” setting automatically returns to
“Standard” (default setting) when you press the
1/RESET button or turn off the console.