


Service 3-5
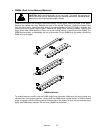
Dollar Bill Validator
(Use MARS AE2451-U5 UL Recognized currency changer)
Dollar bill validators or other currency acceptors may be installed in VGMs that were manufactured
with the additional wiring connector. Switch off power to the VGM and unplug the AC line cord.
Unlock the coin door and swing it open. Read the coin door label for additional information.
Remove nuts, spacers, and cover plate from the door. Change switch settings or make adjustments
before mounting the unit. If the manufacturer has supplied an adapter plate, place it over the door
cutout. Install spacers on threaded studs. Align the validator mounting holes with the studs. Seat the
unit in the door opening. Install and tighten the nuts. Attach the ground wire (green with yellow stripe)
lug to the door ground stud. The stud is beside the hinge. Mate the wiring harnesses and press them
together to fully seat connectors. Route wires away from door edges and hinge. Inspect the bill chute
for proper alignment. Set the dollar bill validator to produce long output pulse widths, 1 pulse per
dollar, and accept dollar bills only. To remove for service or replacement, reverse these steps.
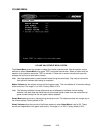
Plug in the line cord and turn on the VGM. From the Menu System, change the mechanism setup and
pricing. Then test known good and bad bills to verify proper operation. Close and lock the coin door.
•
Fans
Switch off power to the VGM. Remove the cabinet rear door. Remove the back of the Arcade
Computer. To remove a fan, disconnect its power harness and remove the fan mounting screws.
Note the fan orientation. Each fan has an arrow molded into its plastic case to indicate airflow
direction. Be certain to reinstall the fans in the proper direction to assure airflow over circuitry.
•
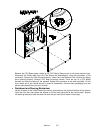
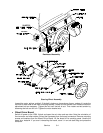
Throttle Lever
Switch off power to the VGM. Unlock and open the coin door. Unlatch and lower the dashboard.
Remove three tamper-resistant bolts at the base of the lever. Lift off the throttle lever. Careful! Cable
remains attached to the lever. To remove throttle assembly, unbolt the assembly cover. Support the
assembly, then unbolt it from inside the control panel.
•
Hard Disk Drive
Switch off power to the game. Unlock and remove the rear door. Remove the back of the Arcade
Computer. Disconnect the DC power cable from the hard disk drive. Unplug the ribbon cable from the
hard drive but leave it attached to the CPU board. Remove the drive mounting screws. Lift the drive
out of the cabinet. Save the mounting screws for reuse in future hard drive installations. When
returning a hard drive to your distributor, pack it in an anti-static bag. Box the drive in approved
shipping container 08-8068.
CAUTION:
Hard disk drives are very fragile! Handle them with care. Keep disk drives
away from magnets, heat and vibration. Don’t move a game with the power on.
CAUTION:
Don’t stack or drop hard disk drives. Use an anti-static bag and an
approved shipping container to return the drive to your distributor.
REINSTALLATION.
Before mounting the hard drive in its bracket, install the drive mounting screws.
To avoid damage during installation, mount the hard drive in the brackets before connecting cables.
After a driver plays one game, the new drive copies data from other linked VGMs.
Important!
The
data won’t copy if players are actively driving. Files transfer only when all VGMs return to Attract
Mode.
•
Audio Amplifier Board
Switch off power to the VGM. Unlock and open the rear door and the coin door. Note the orientation
of the connector and other cables. Extract the harnesses from the board connectors. Remove
mounting screws and washers from the Audio Board. Lift the board off its mounting posts. Handle the
board by a heatsink. If you aren’t reinstalling the board, store it in an anti-static bag and protective
container.