


Service 3-6
•
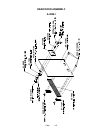
Diego Interface Board
Switch off power to the VGM. Unlock and open the rear door. Extract the harnesses from the board
connectors. Remove mounting screws and washers from the Diego Board. Remove the Diego Board.
Lift the board off its mounting posts. During reinstallation, tighten the screws: Start at the board’s
center and work toward the outer edge. If you aren’t reinstalling the board, store it in an anti-static bag
and protective container.
•
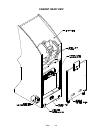
Speakers
Switch off power to the VGM. Unbolt and remove the speaker grille from below the marquee. Note
the orientation of speaker wires. Unbolt and remove the speakers. To remove subwoofer, unlock and
open the rear door. Note the orientation of speaker wires. Unbolt and remove the speaker.
•
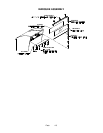
Marquee Light Box
Switch off power to the VGM. Remove the speaker panel screws. Lift off the marquee glass and
artwork to expose the interior of the light box.
•
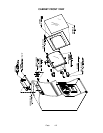
Viewing Glass
Switch off power to the game. Unlock and open the coin door. Unlatch and lower the dashboard.
Remove the glass retaining bracket at the bottom center of the viewing glass. Carefully remove glass
and set aside. Clean glass before reinstalling.
•
Monitor
WARNING:
The video monitor is very heavy, with most of the weight toward
the front. Solidly support the monitor as you remove from it from the cabinet.
WARNING:
When operating the monitor outside the cabinet, use an isolation
transformer. In normal operation, the monitor doesn’t require isolation from AC
line voltage.
Switch off power to the VGM. Unlock and open the coin door. Unlatch and lower the dashboard.
Remove the viewing glass. Lift out the monitor bezel. Remove the flange nuts that secure the
monitor's mounting brackets to its mounting panel. Carefully pull the monitor from the cabinet. Set the
monitor in a safe place. Clean the face of the CRT and viewing glass before reinstalling the bezel and
viewing glass.
•
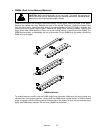
Network Interface Board
Switch off power to the VGM. Unlock and open the rear door. Remove the back of the Arcade
Computer. Note the orientation of the cables. Loosen the header-mounting screw. Disconnect the
network cables from the board header connectors. Remove the circuit board retention bars. Remove
the board. If you aren’t reinstalling the board, store it in an anti-static bag and protective container.
•
Video Card
Switch off power to the VGM. Unlock and open the rear door. Remove the back of the Arcade
Computer. Loosen the header-mounting screw. Disconnect the video cable from the board header
connector. Remove the circuit board retention bars. Remove the board. If you aren’t reinstalling the
board, store it in an anti-static bag and protective container.
•
Filter Board
Switch off power to the VGM. Unlock and open the rear door. Remove the back of the Arcade
Computer. Note the orientation of the cables. Loosen the header-mounting screw. Disconnect the
cables from the board header connectors. Remove the board. If you aren’t reinstalling the board,
store it in an anti-static bag and protective container.