


Getting Started
10
7
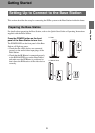
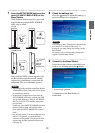
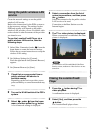
Press the SETUP MODE button on the
front (LF-V30/LF-B20/LF-B10) of the
Base Station.
With the Base Station turned on, press and
hold the button until the SETUP MODE
LED starts to blink.
Wait while the PSP
® system registers with
the Base Station and the network settings
required for establishing a connection are
completed. This is an automatic process.
Notes
• Depending on the condition of the Base Station
and the PSP
® system, it may take a few minutes
to complete the settings.
• If more than 5 minutes pass from when the
SETUP MODE LED starts to blink, the LED
will go from blinking to fully lit (LF-B20/LF-
B10) or to off (LF-V30) and the registration
process ends.
In this case, press the SETUP MODE button on
the Base Station again and hold the button
down until the SETUP MODE LED starts to
blink.
• If a message stating "You must update the base
station" is displayed, you must perform a
software version update. You can perform the
update from the Base Station Settings menu
(1 page 25).
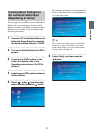
8
Check the settings list.
Press the button to finish the settings. A
network settings list is displayed.
Note
If a message stating "The wireless channel of the
base station is set to the 5 GHz range" is
displayed, you must change the settings for the
Base Station.
For details, refer to the Operating Instructions
supplied with the Base Station.
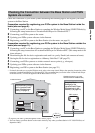
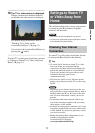
9
Connect to the Base Station.
Select the wireless access point which you
wish to use, and then press the button.
* Screen image simulated.
A connection to the Base Station is
established.
WIRELESS
NETWORK
SETUP
MODE
NET AV
RESET
WIRELESS
NETWORK
SETUP
MODE
NET AV
RESET
SETUP
MODE
SETUP
MODE LED
LF-V30
WIRELESS
NETWORK
SETUP MODE/
NET AV
SETUP MODE
RESET
SETUP MODE
SETUP MODE/
NET AV
SETUP MODE/
NET AV
WIRELESS
NETWORK
SETUP MODE
RESET
SETUP
MODE/
NETAV LED
LF-B20/LF-B10