4-1 (E)
DXF-51
Section 4
Electrical Adjustments
4-1. Preparation
Make adjustment under the following conditions, unless
otherwise specified:
. BRIGHT : Mechanical center
. CONTRAST : Marker points “3 o’clock” position
. PEAKING switch : OFF
. Input signal : Enter NTSC monoscope signal to pin 6
of D-sub 26-pin connector (CN702)
4-2. Switching Power Output (RV501)
Adjustment
n
All items of electrical adjustment must be checked, if this
adjustment was made.
1. Connect a digital voltmeter to TP103.
2. Rotating RV501, adjust the power to DC9.5 ±0.1 V.
4-3. H.V. (RV302) High Voltage
Adjustment
n
The H-SIZE, V-SIZE, and Heater Voltage must be
checked, if this adjustment was made.
1. Connect a high voltage meter too the HV pin of
FBT301 on the P board.
2. Adjust RV302 to attain DC8 kV.
4-4. H-HOLD (RV104) Adjustment
Preparation : No signal input.
1. Connect a frequency counter to TP111.
2. Adjust RV104 to attain 15.734 ±0.1 kHz.
4-5. V-HOLD (RV103) Adjustment
Preparation : No signal input.
1. Connect a frequency counter to TP112.
2. Adjust RV103 to attain 42 ±1Hz.
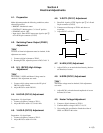
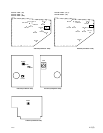
4-6. V-DUTY (RV107) Adjustment
1. Enter PAL signal or NTSC signal to pin 6 of a D-sub
26-pin connector (CN702).
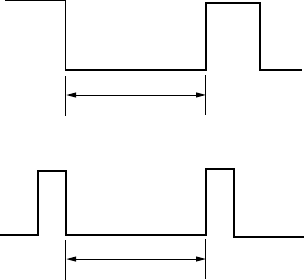
2. Connect an oscilloscope to TP114 and observe a
waveform.
3. Adjust RV107 as follows.
4-7. H-LEN (L302) Adjustment
1. Adjust L302 so as to attain the best linearity (horizon-
tal direction) of screen.
4-8. H-SIZE (RV301) Adjustment
n
The Heater voltage must be checked, if this adjustment
was made.
1. Adjust RV301 so that horizontal amplitude of screen
becomes 98 ±2 mm.
4-9. Heater Voltage Adjustment
1. Connect a digital voltmeter to TP118.
2. Confirm that the voltage is DC11.7 ±0.3 V.
3. If exceeding this specification. Break the solder of
JP301 and JP302 in this order.
18.35 ±0.5 msec
18.35 ±0.5 msec
NTSC
PAL


