


4 C561M-F (8/06)
Installation
MOUNTING INSTRUCTIONS
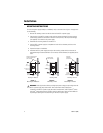
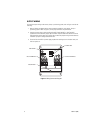
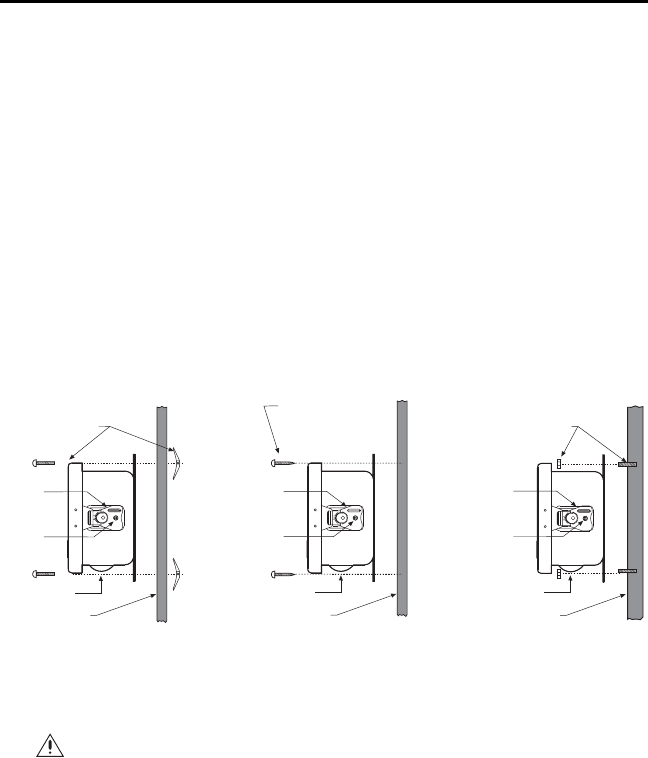
To mount the power supply directly to a wallboard, wall, or concrete refer to Figure 1 through 3 and
do the following:
1. Remove the retaining screw from the door latch of the WCS1-4 power supply.
2. Open the door of the WCS1-4 power supply, and then remove the plug(s) from the required
conduit hole(s) located on the bottom of the unit. Install 3/4-inch (1.91 cm) conduit fitting(s)
(not supplied). Close the lid to the power supply.
3. Determine the mounting location for the WCS1-4.
4. Use the WCS1-4 power supply as a template and mark the four fastener positions on the
mounting surface.
5. Prepare the holes for installation.
6. Attach the WCS1-4 power supply securely to the mounting surface with four fasteners of
appropriate length. Fasteners between 1/4-inch and 5/16-inch diameter (not supplied) can be
used.
Figure 1.
Mounting to Wallboard
Figure 2.
Mounting to Wall
Figure 3.
Mounting to Concrete
WARNING: Under light load conditions and high input power voltage, output voltage from the
WCS1-4 power supply may reach 32 VAC. Pelco recommends that all equipment
connected to the WCS1-4 power supply be rated to handle 32 VAC. Pelco’s Spectra
®
domes
and Esprit
®
integrated positioning systems meet this requirement. Pelco cannot be liable for
any damages resulting from incorrect wiring of the WCS1-4 power supply.
CONDUIT
FITTINGS
CONDUIT
FITTINGS
CONDUIT
FITTINGS
Mounting to Wallboard
Mounting to Wall
MOUNTING HARDWARE WITH
ANCHOR OR TOGGLE BOLT
(NOT SUPPLIED)
Mounting to Concrete
WOOD SCREW
(NOT SUPPLIED)
MOUNTING
HARDWARE
(NOT SUPPLIED)
CONCRETE WALL
WALL
WALLBOARD
DOOR
LATCH
RETAINING
SCREW
DOOR
LATCH
RETAINING
SCREW
DOOR
LATCH
RETAINING
SCREW