


2. OFF
To turn the sight off press both UP and DOWN push-button switches simultaneously. Verify that
the unit is off by looking through the display window.
3. Brightness Adjustment
Push-button switches vary the brightness intensity of the holographic reticle image. Pressing and
releasing the push-button switch moves the brightness level UP or DOWN one (1) step from the
previous setting. Pressing and holding the Up or Down push-button switch will change the
brightness level up or down continuously. There are fifteen (15) brightness settings providing a
dynamic range of 100,000:1 from the lowest setting to the highest setting. When the sight is turned
ON, the brightness intensity level is at Level 10.
4. Auto Shutdown
The Bushnell® Holosight® XLP is equipped with an auto shutdown feature and will automatically
shut itself OFF 8 or 4 hours after the last push-button control is used. This is determined by the
method used to turn it ON in step 1.
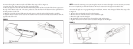
MOUNTING
The
Bushnell® Holosight® XLP is equipped with mounting hardware to attach to a Weaver-style rail or
to a 12 gauge model 1100, 870 or 1187 Remington® shotgun. To achieve the best results and accuracy,
the Bushnell® Holosight® XLP must be mounted properly. For the Weaver-style rail mount, the base
must be parallel to the bore to achieve the maximum elevation and windage adjustments.
4
5
polarity of the exposed contact of the battery. Check the polarity of the battery to be installed and insert
the battery so that the opposite polarity end goes into the battery compartment. To re-install the battery
cover, reverse the steps taken to remove the cover. DO NOT OVERTIGHTEN THE KNURLED
SCREW. Secure it with finger tightness only. Verify correct battery installation by turning on the sight
and checking that the reticle image appears. If the batteries are left in the sight backwards, they will be
drained of their power.
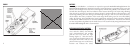
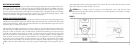
ELECTRONIC FEATURES
The
Bushnell® Holosight® XLP controls are push-button switches located at the top of the unit as
shown in Figure 1. To ensure proper operation of the push button switches, press the switch firmly.
Audible and tactile feedback is provided when properly actuated.
1. ON/ Auto Battery Check
Pressing either the Up or Down push-button switch will turn the sight ON. If the Up arrow is used
to turn the sight ON it will be set at an 8 hour shutdown mode. That is, if the unit is not re-adjusted
for brightness for a period of 8 hours, it will turn off. If the Down arrow is used to turn the
sight ON it will be set at a 4 hour shutdown mode. See step 4 under this section for description of
Auto shutdown. The sight will automatically perform a battery check every time it is turned on. If
the batteries have less than 20% of life left, the sight will turn on with the reticle image blinking on
and off for 5 seconds. If the remaining battery life is more than 20%, the sight will turn on with a
steady reticle pattern. The battery condition can be checked any time by turning the sight off and on.