Page 2 of 8
Installing the BPS-1 Cabinet In New Construction
1. Determine the location for the
Architectural Series Panel
Bracket/Grille and install it
according to its instruction manual.
2. Determine the location for the
BPS-1 cabinet.
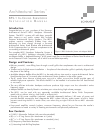
IMPORTANT: THE CENTER OF
PANEL BRACKET’S SPEAKER OPEN-
ING SHOULD BE APPROXIMATELY
12” FROM VENT TUBE END OF BPS-1
ENCLOSURE (SEE
FIGURE 2
).
MAINTAINING THE VENT TUBE’ S
PROPER LENGTH IS INTEGRAL TO THE
BPS-1’S ACOUSTIC PERFORMANCE.
LENGTHENING OR SHORTENING
THE VENT TUBE TO FIT A DIFFERENT
DISTANCE WILL ADVERSELY AFFECT THE BPS-1’S PERFORMANCE.
2. Attach the included Mounting Hole Drilling Template to the ceiling joist at the BPS-1 mounting location
(see
Figure 3
). Make sure that the template is placed high enough so the BPS-1 cabinet will not
contact the ceiling material after installation. (Contact can cause buzzing during operation.)
3. Drill eight
5
/
16" holes through the joist at the locations indicated on the Drilling Template (see
Figure 3)
.
4. Screw the two Temporary Installation Brackets across the underside of the joist bay at the locations
indicated on the Drilling Template (see
Figure 4
). The Temporary Brackets have two sets of pre-drilled
holes: One for 24” center-to-center joist spacing, and another for 16” center-to-center joist spacing.
Architectural Series
™
BPS-1 IN-CEILING SUBWOOFER
I NSTALLATION M ANUAL
Figure 2: Positioning the BPS-1 Relative to the Panel Bracket
(Note: Vent tube not shown for clarity)
WARNING
DO NOT ATTACH THE BPS-1 TO AN I-JOIST THAT HAS NOT BEEN ADEQUATELY BRACED.
DOING SO CAN CAUSE COLLAPSE, RESULTING IN INJURY OR DEATH. CONSULT WITH THE
JOB’S GENERAL CONTRACTOR BEFORE ATTACHING THE BPS-1 TO AN I-JOIST.