


Pelco Manual C519M-D (7/00) [ 13 ]
Zones
The Zone function is available on Esprit and Spectra positioning systems. This function puts a label on
the screen to identify the viewing area. Zones can also be blanked* to prevent viewing while the camera
is positioned in the zone.
Up to eight pan (horizontal) zones can be defined (zones are not affected by tilt or zoom). Higher num-
bered zones take precedence so that if zones overlap, the one with the higher number is in effect. Zone
programming is outlined in Table H.
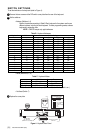
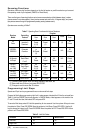
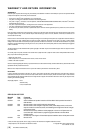
Table H. Zone Programming Procedure
Step Procedure
1. Set left zone limit. a. Use the joystick to position the camera at the start (left limit) of the
zone.
2. Access zone a. Press 8, followed by the zone number N (N = 1 through 8), and then
programming. F4 to display the zone menu.
3. Define a label. a. Use F1 and F2 to find the characters for each position in the label
HINT: To ease (26 upper case letters, 26 lower case letters and 10 numbers).
future title editing, b. Pan left/right to move between character positions. Continue
start each title with selecting characters until the title is completed (up to 20 characters).
Z(N), where c. Move down to the SET field and press ACK.
N = zone number.
4. Set right zone limit. a. Position camera at the right limit of the zone.
b. Press 8, followed by the zone number, and then F5.
c. To view zone titles go to step 6.
5. Clear zones. a. Press 8, followed by the zone number, and then F4.
b. Move down to the SET field and Press ACK.
NOTE: DO NOT pan right.
c. Press 8, followed by the zone number, and then F5.
6. Tun on zones. a. Press 8, 8, Preset.
7. Blank zones.* a. Press 9, 5 and hold Preset for about 2 seconds to display the Edit
Preset 95 menu.
b. Move down to the SET field and press ACK to display the Camera
menu.
c. Move down to the <Alarms, Zone Blank> field and press Iris Open
to display the Alarms, Zone Blank menu.
d. Move down to the <Zone Blank> field and press Iris Open to display
the Zone Blank menu.
e. Move down to the zone number you wish to blank and press Iris
Open to move the cursor arrow to the zone blanking status value.
f. Pan up to turn blanking on, pan down to turn blanking off.
g. Press Iris Open to accept new status; press Iris Close to cancel.
h. Repeat steps 7e through 7g for each zone you wish to change, then
go to step 7i.
i. Move down to Exit and press Iris Open repeatedly to move up
through the menus and return to the normal display.
* Not available in Esprit systems.