


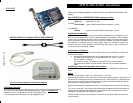
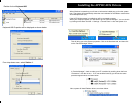

Installing the Applica XP hardware and software
The Applica PCI consists of a PCI multi-display adapter and a USB Keyboard Mouse Con-
verter.
Step 1
Restart your PC so that any pending installations of other products or updates are fully
completed.
(Start→Turn Off Computer→Restart)
Make sure that your system starts up and is running normally
.
Step 2
Shut down the computer (Start→Turn Off Computer→Turn Off). After shutdown, make
sure you also unplug the power cord from the computer or from the electrical outlet.
Remove the computer cover and locate the PCI slots on the large circuit board. Most
computers have several PCI slots. At the end of an unused PCI slot, locate its chrome
filler plate. Lift the latch (or unscrew and save the set-screw) that is retaining the
chrome filler plate.
Note: Some older computers will also have ISA slots (those are the longer slots),
which cannot
be used for Applica.
Step 3
Ground yourself briefly by touching a metal object (such as the computer chassis) with
your fingers, and then remove the ApplicaDS PCI board from its shielded plastic envelope.
Step 4
Install the PCI card in the selected PCI slot by firmly applying pressure along the top of the
board until it slides into place (fully seated and level). Press the latch (or reinstall the set-
screw) to secure the PCI card’s chrome bracket into place. Check that all other PCI boards
have not been accidentally lifted out of their slots.
Note: If you are adding more than one user to your PC do not install additional cards
at this point. It is important to have one new user fully operational prior to installing
additional users. This will simplify your installation process and will reduce trouble-
shooting time if you encounter difficulties.
Step 5
Place the computer cover back to ensure proper airflow within the case.
Step 6
Plug the second monitor, keyboard and mouse into the appropriate connectors on the
board.
Step 7
Turn on your computer. The computer will automatically recognize that new hardware is
present and will install the appropriate PCI driver. However, the new monitor will not start
completely until the Applica XP software is installed.
Step 8
Install the USB converter in any USB port. Connect the second ps/2 keyboard and
mouse to the converter.
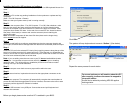
Before you begin please make sure that HT is enabled in your BIOS.
Click OK
The system will map keyboard and mouse to Station 1 (See below)
Repeat the same process for each station.
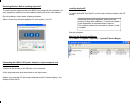
For sound options you will need to reboot the PC
after mapping, to ensure the sound is mapped to
the proper station.
Sound can be added by ordering ADS100 applica
docking station