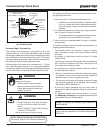
Page 13
Cumberland Gap Wood Stove
R
November 5, 2010
7006-188G
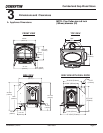
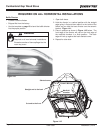
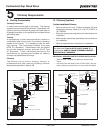
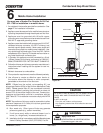
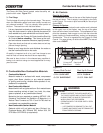
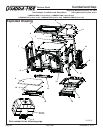
Figure 13.3 - Completed View
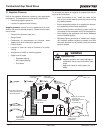
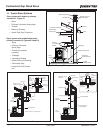
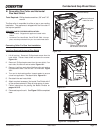
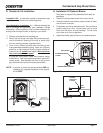
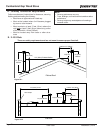
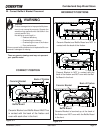
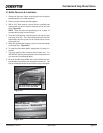
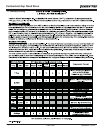
Figure 13.1
Discard heat
shield
Remove 4 screws and set
rear shield & screws aside
Remove bolts and
rotate flue collar
Rear Heat
Shield
Remove cast top
Secure
Horizontal Flue
Heat Shield
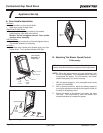
1. Lift off cast top. Remove 4 Phillips head screws from the
heat shield. Discard heat shield and save the screws.
Figure 13.1.
2. Remove 4 Phillips head screws from the rear shield, 2 on
each side, lift shield off and set aside. Figure 13.1.
3.
Remove 1 bolt from each side of the fl ue collar
and retrieve
nuts attached to bolts. Use 3/8" and 7/16" wrenches.
Figure
13.1.
4. Turn vent to horizontal position. Inspect sealant to ensure
a leak free application.
Re-attach bolts. Figure 13.1.
5. Re-attach the rear heat shield.
6. Attach required accessory Horizontal Flue Shield with 2
of the screws removed in Step #1 and secure in place.
7. Follow instructions for placing the Baffl e Diverter on
pages 14 & 15.
8. Place cast top on the unit. See Figure 13.3 for completed
view.
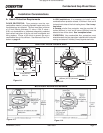
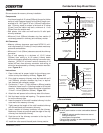
The fl ue collar is reversible for either a top or rear venting
installation. The appliance is shipped with the fl ue collar in
the top vent position.
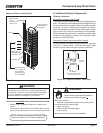
B. Reversible Flue Collar and Horizontal
Flue Heat Shield
Tools Required: Phillips head screwdriver; 3/8" and 7/16"
wrench
Converting Collar For Rear Vent Installation
and
Installing Required Horizontal Flue Shield
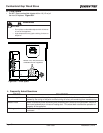
REQUIRED PARTS FOR REAR INSTALLATION:
• Baffl e Diverter: Shipped with appliance located inside
fi rebox
• Horizontal Flue Heat Shield, Part HTSHLD-7006: Not sup-
plied, must be purchased from your local authorized dealer
Figure 13.2