


9
GB
Select optional settings for the clock
Select “Clock Adjustment” using the
directional buttons and press the ¢ button. You
can set the following optional items.
Time Format
•12 hour clock
•24 hour clock
Date Format
•MM/DD/YYYY
•DD/MM/YYYY
•YYYY/MM/DD
Time Zone
Select the appropriate time zone.
Daylight Savings Time (Summer Time)
Set this item to “Daylight Savings Time
(Summer Time)” when daylight savings time is
in effect.
•Standard (Winter Time)
•Daylight Savings (Summer Time)
x Screen Size
Selects the display mode according to the TV to
be connected.
•4:3 : Select this when you connect a standard
TV to the console.
•Full : Select this when you connect a standard
TV to the console. The black margins on the
upper and lower portions of the screen are cut
off.
•16:9 : Select this when you connect a wide-
screen TV to the console.
x DIGITAL OUT (OPTICAL)
Selects whether to output signal through the
DIGITAL OUT (OPTICAL) connector.
•On : Select this when you connect with an
optical digital cable (sold separately).
Normally select this option.
•Off : Select this when you do not want sound
signal to be output via the DIGITAL OUT
(OPTICAL) connector.
x Component Video Out
If your TV, monitor or projector has an RGB
input connector or component video input
connectors (Y, CB/PB, CR/PR) that conform to
the output signals of the console, set this item.
When connecting the console using the
supplied AV cable (integrated audio/video) or
S VIDEO cable (sold separately), you do not
need to set this item.
•Y Cb/Pb Cr/Pr : Select this when you connect
the console to the component video input
connectors.
•RGB : Select this when you connect the
console to the RGB input connector.
Note
You can output PlayStation
®
and PlayStation
®
2 format
software in either RGB or Y Cb/Pb Cr/Pr format.
However, the PlayStation
®
2 console has been designed to
override the “Component Video Out” setting in the
System Configuration menu and output all DVD video
software in Y Cb/Pb Cr/Pr.
x Remote Control
Set this option when using the DVD remote
control (for PlayStation
®
2) which is sold
separately.
•Gameplay Function On: Select this when
operating PlayStation
®
2 or PlayStation
®
format software using the DVD remote
control.
•Gameplay Function Off: Select this when not
operating PlayStation
®
2 or PlayStation
®
format software using the DVD remote
control.
Notes
• When Remote Control is set to “Gameplay Function
On”, some PlayStation
®
2 or PlayStation
®
format
software may stop operating normally when a
controller is removed from controller port 1. Set to
“Gameplay Function Off” if this happens.
• Operation using the DVD remote control buttons may
not work in some cases. Also, the DVD remote control
will not work when you press two or more buttons at
the same time.
• Some unlicensed 3rd party peripherals may not work
with “Gameplay Function” set to “On”. Note that the
use of such peripherals is not recommended and will
void your warranty.
x Language
Selects the language for the on-screen display.
•English
•Traditional Chinese
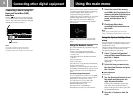
Checking version information
You can check version information or settings of
various features.
At the main menu, press the ¢ button.
The Version Information screen is displayed.
The default settings are underlined.
Connection
x Auto-diagnosis
The PlayStation
®
2 console automatically adjusts
its internal settings for best possible disc
playback.
However, when auto-diagnosis is set to “On”
the console makes additional adjustments that
may allow discs that were previously
unplayable to be played.
Diagnosis
•Off
•On
1 Select “Console” using the
directional buttons and press the
f button.
2 Select “On” using the directional
buttons and press the ✕ button.
3 Insert a disc.
The console automatically starts the
diagnosis.
Note
The diagnosis setting automatically returns to “Off”
(default setting) when you press the 1/reset button or
start playing a PlayStation
®
format disc, PlayStation
®
2
format disc or a DVD video disc.
x PlayStation
®
Driver
The PlayStation
®
Driver is a program for
loading PlayStation
®
format software.
Disc Speed
•Standard: Normally select this position.
•Fast: Loading time for a PlayStation
®
format
software disc can be shortened.
Depending on the software, there may be no
effect or the software may unexpectedly fail.
In this case, select “Standard.”
Texture Mapping
•Standard: Normally select this position.
•Smooth: You can make the display smoother
when playing certain PlayStation
®
format
software titles.
Depending on the software, there may be no
effect. In this case, select “Standard.”
1 Select “PlayStation® Driver”
using the directional buttons and
press the f button.
2 Select the item you want using
the directional buttons and press
the ✕ button.
Note
Adjusted settings automatically return to
“Standard”
(default setting) when you press the 1/reset
button or
turn off the console.
x Clearing the Progressive setting
You can clear the DVD player’s Progressive
setting.
Clear Progressive Setting
•No
•Yes
1 Use the directional buttons to
select “DVD player”, and press
the f button.
2 Press the ✕ button.
3 Use the directional buttons to
select “Yes” and press the ✕
button.
The Progressive setting is not cleared
immediately after it is turned off. The
setting will only be cleared when the
DVD video starts playback.
4 Press the a button to return to
the main menu. Then use the
directional buttons to select
“Browser”, and press the ✕
button.
5 Use the directional buttons to
select the DVD video icon, and
press the ✕ button.
The DVD player’s Progressive setting
is cleared, and playback begins.
Notes
• This setting can be cleared only when “Progressive” is
set to “On”. When “Progressive” is set to “Off”, the
Options menu under DVD Player is not displayed.
• For details on setting “Progressive” to “On”, see
“Progressive” under “Settings and adjustments for the
DVD player” on page 22.
• The progressive setting is not cleared if any of the
following occur before step 5 is completed:
– The console enters standby mode after the
1 (standby)/reset button has been pressed.
– The console is turned off using the main power
switch on the console rear.