


5 6
3 4
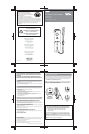
Wii Remote
Jacket
1. Open the lever on the strap lock and place
your hand through the wrist strap. Hold the
remote firmly in your hand.
1. Press the Power button on the Wii console to turn it on.
2. Remove the battery cover on the back of the remote. Press and release the SYNC. button inside
the cover. The Player LEDs will blink.
3. Open the SD Card Slot cover on the front of the Wii console. Press and release the SYNC. button
on the inside of the compartment.
4. When the Player LED blinking stops, connection is complete. The LED that is illuminated
indicates the player number.
5. Close the SD Card Slot cover on the front of the Wii console and replace the battery cover on the
Wii Remote Plus.
2.
Slide the strap lock up so that the strap will
not fall off your wrist. Do not over tighten the
strap lock so that it’s uncomfortable. It should just
be tight enough to hold the wrist strap in place.
Close the lever to hold the strap lock in place.
Wearing the Wii Remote Wrist Strap
Synchronizing your Wii Remote Plus with the Wii console
Warranty and Service Information
Rev. R
FCC and Industry Canada Information
Regulations for Equipment Use in U.S.A. and Canada
This device complies with Part 15 of the FCC rules and RSS-210 of Industry Canada. Operation is subject to the following
two conditions: (1) this device may not cause harmful interference, and (2) this device must accept any interference
received, including interference that may cause undesired operation. Changes or modifications not expressly approved
by the manufacturer could void the user's authority to operate this device.
This equipment has been tested and found to comply with the limits for a Class B digital device, pursuant to part 15 of
the FCC Rules. These limits are designed to provide reasonable protection against harmful interference in a residential
installation. This equipment generates, uses and can radiate radio frequency energy and, if not installed and used in
accordance with the instructions, may cause harmful interference to radio communications. However, there is no
guarantee that interference will not occur in a particular installation. If this equipment does cause harmful interference
to radio or television reception, which can be determined by turning the equipment off and on, the user is encouraged to
try to correct the interference by one or more of the following measures:
• Reorient or relocate the receiving antenna.
• Increase the separation between the equipment and receiver.
• Connect the equipment into an outlet on a circuit different from that to which the receiver is connected.
• Consult the dealer or an experienced radio/TV technician for help.
The term IC before the certification/registration number only signifies that the Industry Canada technical specifications
were met.
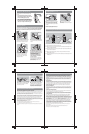
5. If you remove the jacket from the remote,
replace it by inserting the top of the remote
into the large hole on the front of the jacket.
Be sure to push it all the way into the inside of
the jacket.
Thread the wrist strap through hole in the
bottom of the jacket, as shown in step 4, above.
6. Insert the connector cover into the
External Extension Connector on the bottom
of the remote.
Installing Batteries (continued)
This procedure must be followed for each additional Wii Remote Plus added to your system.
You may need only simple instructions to correct a problem with your product. Try our web site at
support.nintendo.com or call our Consumer Assistance Hotline at 1-800-255-3700, rather than going to
your retailer. Hours of operation are 6 a.m. to 7 p.m., Pacific Time, Monday - Sunday (times subject to change). If
the problem cannot be solved with the troubleshooting information available online or over the telephone, you
will be offered express factory service through Nintendo. Please do not send any products to Nintendo without
contacting us first.
HARDWARE WARRANTY
Nintendo of America Inc. ("Nintendo") warrants to the original purchaser that the hardware product shall be free
from defects in material and workmanship for twelve (12) months from the date of purchase. If a defect covered by
this warranty occurs during this warranty period, Nintendo will repair or replace the defective hardware product or
component, free of charge.* The original purchaser is entitled to this warranty only if the date of purchase is
registered at point of sale or the consumer can demonstrate, to Nintendo's satisfaction, that the product was
purchased within the last 12 months.
GAME & ACCESSORY WARRANTY
Nintendo warrants to the original purchaser that the product (games and accessories) shall be free from defects in
material and workmanship for a period of three (3) months from the date of purchase. If a defect covered by this
warranty occurs during this three (3) month warranty period, Nintendo will repair or replace the defective product,
free of charge.*
SERVICE AFTER EXPIRATION OF WARRANTY
Please try our web site at support.nintendo.com or call the Consumer Assistance Hotline at 1-800-255-3700 for
troubleshooting information and repair or replacement options and pricing.*
*
In some instances, it may be necessary for you to ship the complete product, FREIGHT PREPAID AND INSURED
FOR LOSS OR DAMAGE, to Nintendo. Please do not send any products to Nintendo without contacting us first.
WARRANTY LIMITATIONS
THIS WARRANTY SHALL NOT APPLY IF THIS PRODUCT: (a) IS USED WITH PRODUCTS NOT SOLD OR LICENSED BY
NINTENDO (INCLUDING, BUT NOT LIMITED TO, NON-LICENSED GAME ENHANCEMENT AND COPIER DEVICES,
ADAPTERS, SOFTWARE, AND POWER SUPPLIES); (b) IS USED FOR COMMERCIAL PURPOSES (INCLUDING RENTAL); (c)
IS MODIFIED OR TAMPERED WITH; (d) IS DAMAGED BY NEGLIGENCE, ACCIDENT, UNREASONABLE USE, OR BY OTHER
CAUSES UNRELATED TO DEFECTIVE MATERIALS OR WORKMANSHIP; OR (e) HAS HAD THE SERIAL NUMBER ALTERED,
DEFACED OR REMOVED.
ANY APPLICABLE IMPLIED WARRANTIES, INCLUDING WARRANTIES OF MERCHANTABILITY AND FITNESS FOR A
PARTICULAR PURPOSE, ARE HEREBY LIMITED IN DURATION TO THE WARRANTY PERIODS DESCRIBED ABOVE (12
MONTHS OR 3 MONTHS, AS APPLICABLE). IN NO EVENT SHALL NINTENDO BE LIABLE FOR CONSEQUENTIAL OR
INCIDENTAL DAMAGES RESULTING FROM THE BREACH OF ANY IMPLIED OR EXPRESS WARRANTIES. SOME STATES
DO NOT ALLOW LIMITATIONS ON HOW LONG AN IMPLIED WARRANTY LASTS OR EXCLUSION OF CONSEQUENTIAL OR
INCIDENTAL DAMAGES, SO THE ABOVE LIMITATIONS MAY NOT APPLY TO YOU.
This warranty gives you specific legal rights. You may also have other rights which vary from state to state or
province to province.
Nintendo's address is: Nintendo of America Inc., P.O. Box 957, Redmond, WA 98073-0957 U.S.A.
This warranty is only valid in the United States and Canada.
The Wii Remote Plus uses AA batteries. Nintendo recommends high quality alkaline batteries for best
performance and longevity of battery life. If you use rechargeable nickel metal hydride (NiMH)
batteries, be sure to follow the manufacturer’s guidelines for safety and proper usage.
1. Pull the Wii Remote Jacket off the base of
the Wii Remote Plus and pull the wrist strap
out of the hole in the bottom of the jacket.
2. Pull the jacket up the remote far enough
to expose the entire battery door and remove
the door.
3. Insert the batteries into the battery
chamber. Be sure to insert the minus (–)
end first when inserting new batteries,
and remove the plus (+) end first when
replacing the batteries.
4. IMPORTANT: If this is the first time
you have installed batteries in the Wii
Remote Plus, you must synchronize the
remote with the Wii console before
using it. See the next page,
Synchronizing your Wii Remote Plus
with the Wii console, for instructions.
Then return to Step 4.
Replace the battery cover, thread the wrist
strap through the hole in the bottom of the
jacket and pull the jacket back over the
bottom of the remote.
The Wii Remote Plus comes with the Wii Remote Jacket
installed.
• Be sure that the Wii Remote Jacket is installed
during gameplay to reduce the risk of harm to the
remote, surrounding objects, or people.
• It may be necessary to remove the Wii Remote
Jacket – for example, to replace the batteries in the
Wii Remote Plus. If you do remove the Wii Remote
Jacket, be sure to replace it before further play.
Installing Batteries
Setup of the Wii Remote Plus