


WARRANTY AND TECHNICAL SUPPORT
FCC INFORMATION
IMPORTANT NOTES:
FACE PLATE REMOVAL
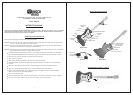
1. Connect the neck to the controller body by sliding the neck into the controller body until you hear a "click".
Make sure that the neck is in place before using. Take care not to pinch your fingers!
Note: When playing Rock BandTM on PS2®, you need to plug the Grinder receiver USB dongle into the PS2® USB
port in order to use the Effects Switch
PS2 Rock Band:
6. Using the switch on the side of the receiver make sure to select either RB or GH depending on which game
you are playing. RockBand
®
= RB Guitar Hero
®
= GH
1. First, make sure your game console is powered up and not in standby.
2. Turn your controller off, count to 5, and turn it back on. Your controller may have entered sleep mode.
3. If that doesn't work, turn off the guitar. Unplug the receiver, count to 5, and plug the receiver back in. Now
turn your guitar back on.
4. If none of these steps work you can try a manual forced connection. Press and release the connect button on
the receiver and immediately press and release the connect button on the back of the controller near the on/off
switch.
5. If it still doesn't work, make sure no objects are blocking the signals between the controller and the receiver.
7. The RED LED indicates that the wireless receiver is getting power. A blinking yellow LED indicates that the
receiver is searching for a controller to connect to.
8. Now turn on your guitar controller. A red LED should be illuminated on the front of the guitar. When the yellow
LED on the wireless receiver stops blinking, the guitar has connected to the wireless receiver.
When using 2 guitars, repeat the steps above 1 at a time. Do not plug in and turn on the controllers at the same time
as they may not connect properly.
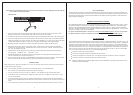
The faceplate on this controller is removable should you want to customize your guitar. To remove the faceplate, you
will need to remove the knob on the end of the effects switch.Grasp the knob and gently pull outwards. Don't loose it!
Now grasp the faceplate button system and squeeze both buttons together while lifting upwards. Follow these same
steps to replace the faceplate.
This equipment has been tested and found to comply with the limits for a class B digital device, pursuant to part 15 of
the FCC rules. These limits are designed to provide reasonable protection against harmful interference in a residential
installation. This equipment generates, uses, and can radiate radio frequency energy and, if not installed and used in
accordance with the instructions, may cause harmful interference to radio communications.However, there is no guara
ntee that interference will not occur in a particular installation. If this equipment does cause harmful interference to
radio or television reception, which can be determined by turning the equipment off and on, the user is encouraged
to try to correct the interference by one or more of the following measures:
Note: Changes or modifications not expressly approved by the party responsible for compliance could void the user's
authority to operate equipment.
Every Blockhead branded product comes with a 90 day warranty (U.S. Only). Blockhead will replace, repair or refund
any defective products or components at no charge to you within 90 days of the purchase date. This warranty does
not apply if the Blockhead branded product has been damaged by misuse, neglect, or reasons unrelated to defective
materials or assembly. Blockhead is not responsible or liable for loss of data or loss of equipment use. You must retain
a copy of your original receipt for warranty support.
For support on Blockhead products, contact us by visiting www.blockheadgaming.com or call us at 727-431-0650.
For general questions, comments, information or grammar tips, email us at info@blockheadgaming.com.
TIPS: If you are unable to connect your controller to the wireless receiver try the following steps:
2. To detach the neck, press the release button and pull the neck outwards being careful not to pinch your fingers.
3. Connect the strap to the controller using the holes in each side of the strap and adjust it to the desired position.
Please pay attention to set this up correctly for a right or left handed player. If you're a lefty, you will also need
to make some changes in the game. Please refer to the game manual for how to make those changes.
4. Make sure the power to the guitar is turned off and insert the batteries. Replace the battery cover.
5. Now connect the wireless receiver to your game console. Please be sure to use the correct corresponding
connectors for your game console. The USB connector is for use with the PS3
®
. The PS2
®
connector is for use
with -yep, you guessed it, the PS2.
3 4
Reorient or relocate the receiving antenna.
Increase the separation between the equipment and the receiver.
Connect the equipment into an outlet on a circuit different from that to which the receiver is connected.
Consult the dealer or an experienced radio/TV technician for help.
USB dongle