


LEAVING THE BATTERY PACK IN THE CHARGER
The charger and battery pack can be left connected with the red light glowing indefinitely. The
charger will keep the battery pack fresh and fully charged.
NOTE: A battery pack will slowly lose its charge when kept out of the charger. If the battery
pack has not been kept on maintenance charge, it may need to be recharged before use. A
battery pack may also slowly lose its charge if left in a charger that is not plugged into an
appropriate AC source.
IMPORTANT CHARGING NOTES
1. After normal usage, your power pack should be fully charged in 3 to 6 hours. If the
power pack is run-down completely, it may take up to 6 hours to become fully charged.
Your power pack was sent from the factory in an uncharged condition. Before attempting
to use it, it must be charged for at least 9 hours.
2. DO NOT charge the power pack in an air temperature below +40°F(+4.5°C), or above
+105°F (+40.5°C). This is important and will prevent serious damage to the power pack.
Longest life and best performance can be obtained if power pack is charged when air
temperature is about 75°F (24°C).
3. While charging, the charger may hum and become warm to touch. This is a normal con-
dition and does not indicate a problem.
4. If the power pack does not charge properly—(1) Check current at receptacle by plugging
in a lamp or other appliance. (2) Check to see if receptacle is connected to a light switch
which turns power off when you turn out the lights. (3) Move charger and power pack to
a surrounding air temperature of 40°F (+4.5°C) to 105°F (+40.5°C). (4) If the receptacle
and temperature are OK, and you do not get proper charging, take or send the power
pack and charger to your local Black & Decker service center. See Tools Electric in yel-
low pages.
5. The power pack should be recharged when it fails to produce sufficient power on jobs
which were easily done previously. DO NOT CONTINUE using unit with its power pack
in a depleted condition.
6. The power pack will reach optimum performance after being cycled 5 times during normal
usage. There is no need to run the batteries down completely before recharging. Normal
usage is the best method of discharging and recharging the power pack.
STORAGE STATIONS MOUNTING:
NOTE: Only use anchors supplied with CCC3000 units to properly affix the unit to wall.
If mounting to drywall:
NOTE: This detail must be hung a minimum of 5 feet from the ground surface to properly
hang tools.
• If not using wall studs:
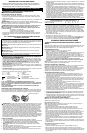
• Place metal mounting strip against wall (per fig. 3).
• Transfer location of three slotted holes in strip to wall.
• Drill 1/8 inch pilot hole per marked location through drywall.
• Using one anchor per slot thread the anchor into wall until flush with surface.
• Align metal mounting strip slots with anchors and install #8 self-tapping screw through
mounting strip into anchor until fully seated.
• Align storage station with string trimmer icon on left most location of the mounting strip.
Using (4) #8 self-tapping screws attach hanger to mounting strip.
• Align storage station with hedge trimmer icon on the center location of mounting strip.
Using (4) #8 self-tapping screws attach hanger to mounting strip.
• Align storage station with sweeper icon on the rightmost location of mounting strip. Using
(4) #8 self-tapping screws attach hanger to mounting strip.
If mounting to wood studs:
• Locate wall studs.
• Place metal mounting strip against wall (per fig. 3).
• Transfer location of three slotted holes in mounting strip to wall studs.
• Align metal mounting strip slots with wall studs and install #8 self-tapping screw through
mounting strip into wall studs until fully seated.
• Align storage station with string trimmer icon on left most location per the mounting strip.
Using (4) #8 self-tapping screws attach hanger to mounting strip.
• Align storage station with hedge trimmer icon on the center location per mounting strip.
Using (4) #8 self-tapping screws attach hanger to mounting strip.
• Align storage station with sweeper icon on the rightmost location per mounting strip. Using
(4) #8 self-tapping screws attach hanger to mounting strip.
THE RBRC™ SEAL
The RBRC™ (Rechargeable Battery Recycling Corporation)
Seal on the nickel-cadmium battery (or battery pack) indicates that the costs to
recycle the battery (or battery pack) at the end of its useful life have already
been paid by Black & Decker. In some areas, it is illegal to place spent nickel-
cadmium batteries in the trash or municipal solid waste stream and the RBRC program
provides an environmentally conscious alternative.
RBRC in cooperation with Black & Decker and other battery users, has established programs
in the United States and Canada to facilitate the collection of spent nickel-cadmium batteries.
Help protect our environment and conserve natural resources by returning the spent nickel-
cadmium battery to an authorized Black & Decker service center or to your local retailer for
recycling. You may also contact your local recycling center for information on where to drop
off the spent battery, or call 1-800-8-BATTERY.
IMPORTANT: To assure product SAFETY and RELIABILITY, repairs, maintenance and
adjustment should be performed by authorized service centers or other qualified service
organizations, always using identical replacement parts.
SERVICE INFORMATION
All Black & Decker Service Centers are staffed with trained personnel to provide customers
with efficient and reliable power tool service. Whether you need technical advice, repair, or
genuine factory replacement parts, contact the Black & Decker location nearest you. To find
your local service location, refer to the yellow page directory under "Tools—Electric" or call:
1-800-544-6986 or visit www.blackanddecker.com
FULL TWO-YEAR HOME USE WARRANTY
Black & Decker (U.S.) Inc. warrants this product for two years against any defects in material
or workmanship. The defective product will be replaced or repaired at no charge in either of
two ways.
The first, which will result in exchanges only, is to return the product to the retailer from whom
it was purchased (provided that the store is a participating retailer). Returns should be made
within the time period of the retailer’s policy for exchanges (usually 30 to 90 days after the
sale). Proof of purchase may be required. Please check with the retailer for their specific
return policy regarding returns that are beyond the time set for exchanges.
The second option is to take or send the product (prepaid) to a Black & Decker owned or
authorized Service Center for repair or replacement at our option. Proof of purchase may be
required.Black & Decker owned and authorized Service Centers are listed under
"Tools-Electric" in the yellow pages of the phone directory.
This warranty does not apply to accessories. This warranty gives you specific legal rights and
you may have other rights which vary from state to state or province to province. Should you
have any questions, contact the manager of your nearest Black & Decker Service Center.
This product is not intended for commercial use.
FREE WARNING LABEL REPLACEMENT: If your warning labels become illegible or are
missing, call 1-800-544-6986 for a free replacement.
See ‘Tools-Electric’
– Yellow Pages –
for Service & Sales
Imported by
Black & Decker (U.S.) Inc.,
701 E. Joppa Rd.
Towson, MD 21286 U.S.A.
VOICI DES RENSEIGNEMENTS IMPORTANTS QU’IL VOUS FAUT
CONNAÎTRE :
• Charger la pile pendant 9 heures avant d'utiliser l'outil.
• Le bloc-pile n'est pas complètement chargé à sa sortie de l'usine. Lire toutes les
mesures de sécurité avant de s'en servir.
Merci d’avoir choisi Black & Decker!
Consulter le site Web
www.BlackandDecker.com/NewOwner
pour enregistrer votre nouveau produit.
À
LLIIRREE AAVVAANNTT DDEE RREETTOOUURRNNEERR CCEE PPRROODDUUIITT
PPOOUURR QQUUEELLQQUUEE RRAAIISSOONN QQUUEE CCEE SSOOIITT ::
Si des questions ou des problèmes surgissent après l’achat d’un produit Black & Decker,
consulter le site Web
HTTP://WWW.BLACKANDDECKER.COM/INSTANTANSWERS
Si la réponse est introuvable ou en l’absence d’accès à Internet, composer le
1-800-544-6986 de 8 h à 17 h HNE, du lundi au vendredi, pour parler avec un agent.
Prière d’avoir le numéro de catalogue sous la main lors de l’appel.
pour obtenir des réponses instantanément 24 heures par jour.
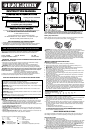
ACCESSOIRES DE RANGEMENT DU
CHARGEUR ET DU PORTE-OUTIL
Numéro de catalogue : CCC3000
CONSERVER CE MANUEL POUR UN USAGE ULTÉRIEUR.
MODE D’EMPLOI
AVERTISSEMENT : AVERTISSEMENTS DE SÉCURITÉ ET
DIRECTIVES DE PREMIÈRE IMPORTANCE
RÉDUCTION DES RISQUES DE BLESSURES :
• Avant tout usage, s'assurer que tout utilisateur de cet outil lise et comprenne toutes les
directives de sécurité ainsi que l’information comprise dans le présent manuel.
• Conserver ces directives et les examiner fréquemment avant d’utiliser l’appareil ou de
donner des directives aux autres.
AVERTISSEMENT : Afin de réduire les risques d’incendie, de secousses électriques ou
de blessures lorsqu’on utilise des outils électriques, il faut toujours respecter les mesures
de sécurité suivantes.
AVERTISSEMENT : Certaines poussières produites par cet outil contiennent des
produits chimiques reconnus par l’État de la Californie comme pouvant causer le
cancer, les anomalies congénitales et d’autres dangers pour la reproduction. Voici
quelques exemples de ces produits chimiques :
• composés présents dans les engrais
• composés présents dans les insecticides, herbicides et pesticides
• arsenic et chrome provenant de bois traité chimiquement
Pour réduire votre exposition à ces produits chimiques, porter un équipement de sécurité
approuvé comme un masque anti-poussières conçu spécialement pour filtrer les particules
microscopiques.
BIEN LIRE ET COMPRENDRE TOUTES LES DIRECTIVES AVANT
D’UTILISER L’OUTIL
.
LIGNES DIRECTRICES EN MATIÈRE DE SÉCURITÉ - DÉFINITIONS
Il est important que vous lisiez et compreniez ce mode d’emploi. Les informations qu’il
contient concernent VOTRE SÉCURITÉ et visent à ÉVITER TOUT PROBLÈME. Les
symboles ci-dessous servent à vous aider à reconnaître cette information.
DANGER : Indique une situation dangereuse imminente qui, si elle n’est pas évitée,
causera la mort ou des graves blessures.
AVERTISSEMENT : Indique une situation potentiellement
dangereuse qui, si elle n’est pas évitée, pourrait causer la mort ou de graves blessures.
MISE EN GARDE : Indique une situation potentiellement dangereuse qui, si elle n’est pas
évitée, pourrait causer des blessures mineures ou modérées.
MISE EN GARDE : Utilisé sans le symbole d’alerte à la sécurité, indique une situation
potentiellement dangereuse qui, si elle n’est pas évitée, peut résulter en des dommages à la
propriété.
AVERTISSEMENTS ET DIRECTIVES DE SÉCURITÉ GÉNÉRALES
POUR TOUS LES OUTILS.
• UN OUTIL À PILES (à piles intégrées ou à bloc-pile amovible) doit seulement être chargé
au moyen du chargeur spécifique à l'outil. En effet, un chargeur conçu pour un type de pile
peut présenter des risques d'incendie lorsqu'utilisé avec un autre type de piles.
• UTILISER L'OUTIL À PILES UNIQUEMENT avec le bloc-pile spécifique à cet effet.
L'utilisation de tout autre type de piles présente un risque d'incendie.
• NE PAS UTILISER NI CHARGER des piles sous la pluie.
• MANIPULER LES PILES AVEC SOIN afin de ne pas les court-circuiter avec des matéri-
aux conducteurs comme des bagues, des bracelets et des clés. Les piles ou le conducteur
pourrait alors surchauffer et causer des brûlures.
• NE PAS OUVRIR NI MUTILER les piles. L'électrolyte qui s'en dégagerait est corrosive et
elle pourrait blesser les yeux ou la peau. En outre, ce produit est toxique lorsqu'ingéré.
L’étiquette de l’outil peut comporter les symboles suivants.
V ..........................volts A..........................ampères
Hz..........................hertz W ........................watts
min ........................minutes ......................courant alternatif
....................courant continu
n
o ........................sous vide
..........................
construction de classe II
............................borne de mise à la terre
..........................symbole d´avertissement
.../min ............................tours à la minutetours ou courses à la minute
NOTE : SUSPENDRE LES OUTILS PRÉVUS À CET EFFET SEULEMENT.
NOTE : LA DISPOSITION DES OUTILS SUR LE PORTE-OUTIL DOIT ÊTRE LA
SUIVANTE : LE TAILLE-BORDURES SUR LA GAUCHE, LE TAILLE-HAIE AU CENTRE
ET LE BALAYEUR SUR LE CÔTÉ DROIT (FIG. 4)
NOTE : AFIN DE PRÉVENIR LES RISQUES DE BLESSURES, NE PAS SUSPENDRE
DES OUTILS DANS DES ENDROITS ACCESSIBLES À DES ENFANTS.