


RADICA: ®
GAMESTER ®
"THE UNFAIR ADVANTAGE" IS A
TRADEMARK OF RADICA GAMES, LTD.
©2003 RADICA GAMES LTD.
PRODUCT SHAPE™
ALL RIGHTS RESERVED
Distributed in the U.K. by:
RADICA U.K. Ltd.
The Old Stables, Munns Farm,
Cole Green, Hertfordshire,
SG14 2NL, England
All other product and company names mentioned are the trademarks of their
respective owners
Not suitable for children under 8 years of age.
Nicht für Kinder unter 8 Jahren geeignet.
Ne convient pas aux enfants de moins de 8 ans.
Distributed in the U.S. by:
RADICA USA, Ltd.
13628 - A Beta Road, Dallas,
Texas 75244 - 4510, U.S.A
Game Boy Advance and Game Boy Advance SP are
trademarks of Nintendo Co., Ltd.
This product is not designed, manufactured,
sponsored or endorsed by Nintendo Co., Ltd.
Please retain this for future reference
www.theunfairadvantage.com
Headphone Multi Port
1. Plug into power lead on the GBA SP. Adaptor provides a dual input of
both the headphones and the power adapter (either AC or car adapter).
Car Adapter
1. Use only on the circular 12V adapter found in car/airplane
powerpoints and cigarette lighters. Recharges GBA SP similar to AC
adapter.
2. Contains removable fuse in case of power surges.
To Change the Fuse: Unscrew the plastic flange at the tip of the adaptor
and replace with a fuse rated at 2 Amperes, 250 Volts. Do not use a fuse
with different ratings. Failure to use the correct fuse could damage your
game and cause personal injury.
3. Keep the car adapter away from moisture and extreme temperatures.
4. If damage or malfunction occurs, discontinue use and contact the
Radica Player Helpline.
Multi-Link Cable
The unique Gamester multi-link cable combines the GBA to GBA link
cable and the GBA to GameCube link cable in one product.
For GBA to GBA:
1. Place link end marked “1P” into your GBA SP loaded with a link
compatible cartridge.
2. Place link end marked “2P” in additional GBA or GBA SP
3. For additional linked GBAs, use additional link cable connected to
female socket in the middle of the multi-link cable
For GBA to GameCube
1. Place GameCube link end into GameCube console loaded with a
GBA to GC link compatible game.
2. Place link end marked “1P” into your GBA SP with additional game
cartridge if necessary.
Grips
1. Slide grips into position on the lower half of the GBA SP in a proper
orientation so that power and volume switches are accessible.
2. When storing the GBA SP, remove Grips and store separately in the
Kit Bag.
Mag Lens
1. Snap magnifier lens in place on the upper half of the GBA SP and
position over the screen.
2. When storing the GBA SP, remove Mag Lens and store separately in
the Kit Bag.
Skins
1. Remove backing to the Skins.
2. Align the various button holes to properly fit Skins to your GBA SP.
3. Place firmly to your GBA SP and smooth out with your fingers
To Remove Skins
1. Using your fingernail, gently lift the corner of the Skins.
2. With even strength, pull the entire Skins off of your GBA.
Note: Once removed, Skins cannot be reapplied.
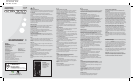
Kit Bag
To effectively store all items in the kitbag, please review the following
diagram.
Double entrée pour casque
A brancher sur la prise d'alimentation du GBA SP. L'adaptateur
fournit une double entrée destinée à la fois au casque et à
l'adaptateur d'alimentation (adaptateur secteur ou pour voiture).
Adaptateur Allume-cigare
1. A n'utiliser que sur les adaptateurs 12V rencontrés sur les
prises de voiture/avion et sur les allume-cigares. Recharge le
GBA comme un adaptateur secteur.
2. Contient un fusible amovible protégeant des surtensions.
Pour changer le fusible: Dévisser la bride en plastique située à
l'extrémité de l'adaptateur et remplacer par un fusible de 2
Ampères, 250 Volts. Ne pas employer de fusible de valeur
différente. L'emploi d'un fusible incorrect risque d'endommager
votre jeu et de vous causer des blessures.
3. Conserver l'adaptateur de voiture à l'abri de l'humidité et des
températures extrêmes.
4. En cas de dégâts ou de mauvais fonctionnement, cesser
d'utiliser l'appareil et contacter l'assistance téléphonique de
Radica.
Câble Multi-Link
Le câble multi-link propre à Gamester associe en un seul produit
le câble GBA-GBA et le câble GBA-GameCube.
En mode GBA-GBA :
1. Insérez l'extrémité marquée “1P” dans votre GBA SP équipé
d'une cartouche multi-joueurs.
2. Insérez l'extrémité marquée “2P” dans un autre GBA ou GBA
SP.
3. Pour connecter d'autres GBA, employez d'autres câbles reliés
à la prise femelle située au milieu du câble multi-link.
En mode GBA-GameCube
1. Insérez l'extrémité GameCube dans un GameCube accueillant
un jeu compatible GBA-GameCube.
2. Insérez l'extrémité “1P” dans votre GBA SP accueillant, si
nécessaire, une cartouche de jeu supplémentaire.
Grips
1. Glissez les grips en position dans la partie inférieure du GBA
SP de manière à laisser accessibles l'interrupteur d'alimentation
et le réglage de volume.
2. Lors du rangement du GBA SP, retirez les grips et rangez-les
séparément dans le sac de rangement.
Loupe
1. Installez la loupe en l'accrochant à la partie supérieure du GBA
SP et positionnez-la au-dessus de l'écran.
2. Lors du rangement du GBA SP, détachez la loupe et rangez-la
séparément dans le sac de rangement.
Skins
1. Retirez la pellicule protégeant l'arrière des Skins.
2. Alignez les trous correspondant aux boutons afin de
positionner les Skins sur votre GBA SP.
3. Mettez en place fermement sur le GBA SP et lissez à l'aide des
doigts.
Pour retirer les Skins
1. Soulevez doucement le coin des Skins à l'aide d'un ongle.
2. Retirez les Skins du GBA en employant une force également
répartie.
Note : tout enlèvement est définitif.
Sac de rangement
Pour ranger efficacement tous les objets dans le sac de
rangement, examinez le schéma suivant :
Kopfhörer-Multiport
1. In den Spannungseingang des Game Boy Advance™ SP stecken.
Der Adapter besitzt einen Eingang für den Kopfhörer und einen
Eingang für den Spannungsadapter (Netz- oder Fahrzeugadapter).
Fahrzeugadapter
1. Nur den runden 12V-Adapter verwenden, der in
Spannungsanschlüssen von Autos oder Flugzeugen und in
Zigarettenanzündern zu finden ist. Versorgt den Game Boy
Advance™ SP ähnlich wie der Netzadapter.
2. Enthält eine auswechselbare Überspannungssicherung.
So wird die Sicherung ausgewechselt: Den Kunststoff-Flansch an der
Spitze des Adapters abschrauben und durch eine Sicherung für 2
Ampere und 250 Volt ersetzen. Keine Sicherung mit anderen
Spezifikationen verwenden. Bei Verwendung einer ungeeigneten
Sicherung könnte Ihr Spiel beschädigt werden und könnten
Personen verletzt werden.
3. Den Fahrzeugadapter vor Feuchtigkeit und extremen
Temperaturen schützen.
4. Im Falle einer Beschädigung oder einer Fehlfunktion die
Benutzung des Geräts einstellen und die Radica Player Helpline
verständigen.
Multilink-Kabel
In dem einzigartigen Gamester-Multilink-Kabel werden das Game
Boy Advance™ Game Link™-Kabel und das Game Boy Advance™-
GameCube-Link™-Kabel in einem einzigen Produkt kombiniert.
Game Boy Advance™ an Game Boy Advance™:
1. Das mit „1P“ gekennzeichnete Kabelende an den Game Boy
Advance™ SP anschließen, in dem sich ein verbindungskompatibles
Modul befindet.
2. Das mit „2P“ gekennzeichnete Kabelende an zusätzlichen Game
Boy Advance™ oder Game Boy Advance™ SP anschließen.
3. Zum Anschließen weiterer Game Boy Advance™-Geräte
zusätzliches Verbindungskabel an die Buchse in der Mitte des
Multilink-Kabels anschließen.
Game Boy Advance™ an GameCube:
1. Das GameCube-Kabelende an den GameCube anschließen, in
dem sich ein Spiel befindet, das den Anschluss eines Game Boy
Advance™ an einen GameCube unterstützt.
2. Mit „1P“ gekennzeichnetes Kabelende an den Game Boy
Advance™ SP anschließen, in dem sich ggf. ein zusätzliches
Spielmodul befinden muss.
Griffe
1. Griffe in der unteren Hälfte des Game Boy Advance™ SP in der
richtigen Ausrichtung einschieben, damit der Power-Schalter und der
Lautstärkeregler erreichbar sind.
2. Beim Wegräumen des Game Boy Advance™ SP die Griffe
abnehmen und separat in der Zubehörtasche aufbewahren.
Vergrößerungsglas
1. Vergrößerungsglas in der oberen Hälfte des Game Boy
Advance™ SP einsetzen und auf dem Bildschirm positionieren.
2. Beim Wegräumen des Game Boy Advance™ SP das
Vergrößerungsglas abnehmen und separat in der Zubehörtasche
aufbewahren.
Skins
1. Die Schutzfolie an der Rückseite der Skins abziehen.
2. Die Aussparungen der Skins für die Tasten korrekt an den Tasten
ausrichten, um die Skins wie vorgesehen am Game Boy Advance™
SP anzubringen.
3. Skins fest auf dem Game Boy Advance™ SP auflegen und mit
den Fingern glätten.
Skins abziehen
1. Mit den Fingernägeln vorsichtig die Ecken der Skins anheben.
2. Die Skins mit gleichmäßiger Krafteinwirkung vom Game Boy
Advance™ abziehen.
Hinweis: Abgezogene Skins können nicht wieder angebracht
werden.
Zubehörtasche
Zur korrekten Aufbewahrung aller Gegenstände inder
Zubehörtasche bitte folgendes Diagramm beachten.
90-DAY LIMITED WARRANTY
(This product warranty is valid in the United States and
Canada only)
Radica Games Limited warrants this product for a period of 90
days from the original purchase date under normal use against
defective workmanship and materials (batteries excluded). This
warranty does not cover damage resulting from accident,
unreasonable use, negligence, improper service or other causes
not arising out of defects in material or workmanship. Radica
Games Limited will not be liable for any costs incurred due to
loss of use of this product or other incidental or consequential
costs, expenses or damages incurred by the purchaser. Some
states do not allow the exclusion or limitation of incidental or
consequential damages, so the above limitations may not apply
to you. This warranty gives you specific legal rights and you may
also have other legal rights, which vary from state to state.
During this 90-day warranty period, the game will either be
repaired or replaced (at our option) without charge to the
purchaser when returned prepaid with proof of date of purchase
to: Radica USA, Ltd., 13628-A Beta Road, Dallas, Texas
75244, USA. Please remove the batteries and wrap the unit
carefully before shipping. Please include a brief description of
the problem along with your return address and mail it postage
prepaid.
IMPORTANT: Before returning the unit for repair, test it with
fresh alkaline batteries. Even new batteries may be defective or
weak and low battery power is a frequent cause of unsatisfactory
operation.
PRODUCT WARRANTY
(This product warranty is valid in the United Kingdom only)
All products in the RADICA® range are fully guaranteed for a
period of 3 months from the original purchase date under normal
use, against defective workmanship and materials (batteries
excluded). This warranty does not cover damage resulting from
accident, unreasonable use, negligence, improper service or
other causes not arising out of defects in material or
workmanship.
In the unlikely event that you do experience a problem within the
first 3 months, please telephone the UK Technical Support team:
Tel. 0906 213 0001 (call cost 25p a minute).
IMPORTANT: Always test the product with fresh alkaline
batteries. Even new batteries may be defective or weak and low
battery power is a frequent cause of unsatisfactory operation.
YOUR STATUTORY RIGHTS ARE NOT EFFECTED.
US Player Helpline
1.800.803.9611
UK Player Helpline
+44 (0)906 213 0001
Calls from the UK are charged at £0.25 per minute and will show up
on your standard telephone bill. Helpline hours 8am-11pm 7 days a week.
1. Car Adaptor
2. Link Cable
3. Game Boy AC Adaptor
(Not Included)
4. Mag Lens (Under Flap)
5. Grips (Under Flap)
6. Headphone Adaptor
7. Headphones
Packing Your Kit Bag
1 2
5
4
76
3
P/N 82377300 Rev.B
73810 Manual (US/UK)
P/N: 82377300 Rev.B
Date: Mar. 19, 2003
TM