WARNING: EPILEPSY AND SEIZURES
READ BEFORE OPERATING YOUR PLAY TV
A few people may experience epileptic seizures when viewing flashing lights
or patterns in our daily environment. These persons may experience seizures
while watching TV pictures or playing video games. Players who have not
had any seizures may nonetheless have an undetected epileptic condition.
Consult your physician before playing video games if you have an epileptic
condition or experience any of the following symptoms while playing video
games: altered vision, eye or muscle twitching, other involuntary move-
ments, loss of awareness of your surroundings, mental confusion and/or
convulsions.
WARNING: Make sure you are located far enough from the TV and any
other objects, people or animals to avoid striking anything or anyone when
you cast and pull in the rod.
It’s man against fish in this realistic fishing game and Fishing Legend Hank
Parker is along for the ride! Set your ideal fishing conditions, choose a rod
and lure and navigate your boat to the best bass bitin’ areas. Along the way,
Hank will offer advice to help you land the legendary Lunker.
SETTING UP PLAY TV BASS FISHIN’
POLE INSTALLATION
Insert the pole as indicated in the diagram and turn the pole clockwise until it
snaps into place.
BATTERY INSTALLATION AND REPLACEMENT
Loosen the screw on the side of the fishing rod battery compartment door
with a screwdriver. Remove the battery compartment door and insert two (2)
AA batteries (we recommend alkaline), first one on the left side and then one
on the right side as indicated in the battery compartment. Move the sliding
tabs to the end of the batteries. Then, insert two (2) additional AA batteries
(we recommend alkaline) as above and as indicated in the battery compart-
ment. Replace the battery compartment door and tighten the screw with a
screwdriver. Do not over tighten.
ADULT SUPERVISION IS RECOMMENDED WHEN INSTALLING BATTERIES.
CONNECTING PLAY TV BASS FISHIN’ TO YOUR
TV OR VCR
CONNECTING TO YOUR TV
To connect Play TV Bass Fishin’ directly to a TV, the TV must be equipped
with audio and video input jacks. They are commonly found on the front of
the TV near the contrast, color and picture adjustment controls; or on the
back of the TV near the antennae and cable/satellite jacks.
• Insert the yellow video plug from the fishing rod into the Video-In (yellow)
jack on the TV.
• Insert the white audio plug from the rod into the left Audio-In (white) jack
on the TV.
• Set your TV to the appropriate video input mode. (See your TV’s operating
manual for details.)
CONNECTING TO YOUR VCR
If your TV does not have audio and video
input jacks, you can connect
Play TV Bass Fishin’ to your VCR.
• Insert the yellow video plug from the
fishing rod into the Video-In (yellow)
jack on the VCR.
• Insert the white audio plug from the
rod into the left Audio-In (white)
jack on the VCR.
•
Set your TV and VCR to the appropri-
ate video input mode. (See your TV
and VCR operating manuals for details.)
NOTE: If your TV or VCR does not have AV inputs, a “Y” adapter may be
purchased separately at any electronics store.
ADULT SUPERVISION IS RECOMMENDED WHEN CONNECTING CABLES
TO A TV AND VCR.
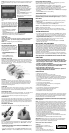
BUTTON FUNCTIONS
Power (PWR) - Press this button to turn the game on or off.
Menu - Press this button any time during game play to view the Menu
(Volume, Credits, Quit, Set-Up).
Directional - Press this button to scroll Up, Down, Left and Right through
the on-screen options.
Forward (FWD) - Press this button to highlight the next available option.
Back - Press this button to highlight the previous available option.
Select - Press this button to choose a highlighted option.
Reset - Press this button, using a blunt object to reset the game in the
event of a malfunction.
GETTING STARTED
Once Play TV Bass Fishin’ is connected to your TV, turn on the TV and set it
to the appropriate video input mode. (See your TV operating manual for
details.) If Play TV Bass Fishin’ is connected to your TV and VCR, turn on
the TV and VCR and set both to the appropriate video input modes. (See
your TV and VCR operating manuals for details.)
• Press the Power button on the fishing rod to turn on the power. A game
demo will start to play.
• Press the Select button to interrupt the demo and go to the Main Menu
screen.
MAIN MENU SCREEN
The Main Menu has five options: Go Fishing Now, Free Fishing Set-Up,
Tournament Set-Up, Free Fishing High Score and Tournament High Score.
•
Press the Back button or the Forward button to highlight the previous or
next available option.
• Press the Select button to choose the highlighted option.
NOTE: If you select “Go Fishing Now,” you’ll automatically go to the fishing
screen.
FREE FISHING MODE
This is a non-timed fishing session. If you land a big one, you’ll get to enter
your name in the High Score Sign-In screen. You can fish in this mode at
three skill levels: Novice, Skilled or Expert.
TOURNAMENT MODE
This is a timed fishing session. Tournaments run from 6:30 AM to 5:30 PM
in “game” time and are played for 24 minutes of “real” time. The combined
weight of the top five catches will determine the tournament champions.
Individual “biggest fish” awards are also given for the highest weights. You
can fish in this mode at three skill levels: Novice, Skilled or Expert.
SET-UP SCREEN
If you select Free Fishing Set-Up or Tournament Set-Up from the Main Menu
screen, you’ll automatically go to the Set-Up screen. From here, you will
select your skill level (Novice, Skilled or Expert); weather conditions (sunny,
cloudy or rainy); and time of day (morning, afternoon or evening). (only avail-
able in Free Fishing Set-Up)
• Press the Back button or the Forward button to scroll though the options.
The currently selected option will become highlighted.
•
Press the Select button to choose the highlighted option.
•
When you have finished making your selections, press the Back button or
Forward button to highlight the OK icon. Press the Select button to
continue.
To return to the previous screen, use the Back button or Forward button to
highlight the back arrow. Press the Select button to return to the previous
page.
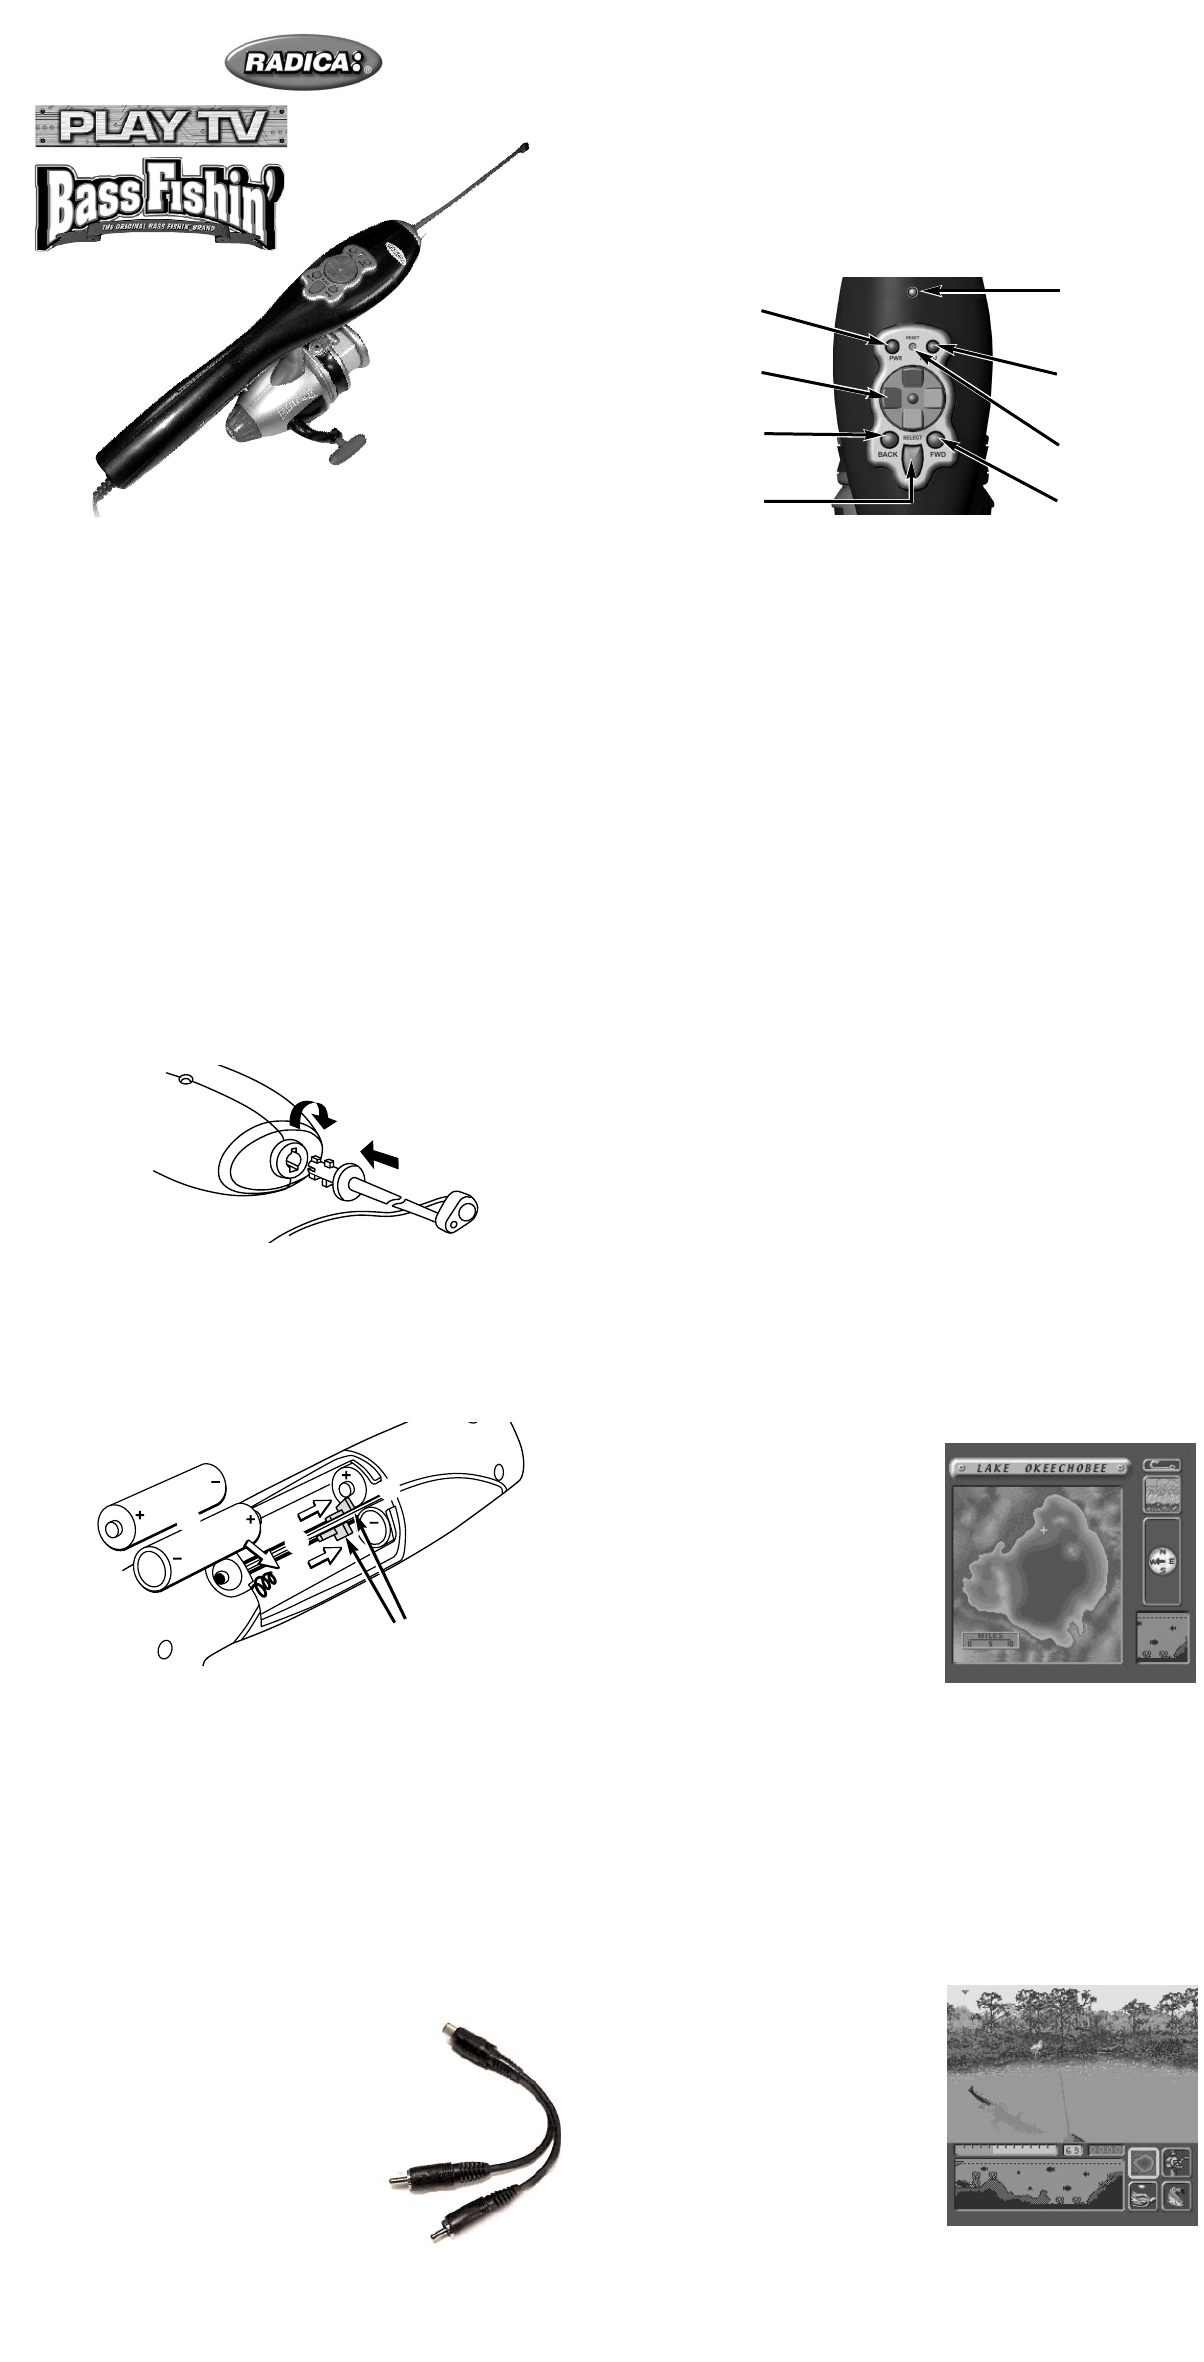
MAP SCREEN
The Map Screen shows an overhead
view of Lake Okeechobee, Florida. You
will use this map to navigate your boat
to your desired fishing location. On the
right-hand side of the screen, you’ll see
a weather
condition gauge, a water clarity
indicator and a water temperature
gauge. Below these devices is a Fish
Finder, which displays the
bottom-depth, terrain, and actual
groups of fish for each area as you
navigate your boat around the lake.
NOTE: In Tournament mode, a digital clock will appear on the Map Screen
to show how much time has elapsed, including travel time.
NAVIGATING YOUR BOAT
The red icon on the Map Screen represents your boat. The direction of the
bow on the boat icon is the direction your boat is pointing. The blue layers
represent the depth of the water, ranging from light blue (shallow) to dark
blue (deep).
• Press the Back button or the Forward button to highlight the map.
• Use the Directional button to navigate your boat through the lake. Keep
an eye on the Fish Finder for an area with plenty of bass.
• When you have selected an area, use the Back button or Forward button
to highlight the lure icon at the top right-hand side of the screen
• Press the Select button to advance to the fishing screen. Good luck!
FISHING SCREEN
The fishing screen is divided into two
sections: the top half displays the view
of Lake Okeechobee from your boat.
The bottom half of the screen shows the
bottom of the lake, the location of your
lure and the bass. You will also see a
lineout indicator, a line tension indicator
(in the form of a bar graph) and a digital
countdown clock (active during
Tournament mode).
The brown line on the screen represents
your fishing rod. Use the Directional
button to move your pole left and right
before casting. The red dot represents your lure’s destination point.
There are four icons on the bottom right-hand side of the screen. These
icons represent Map Screen, Rod and Line, Tackle Box and Live Well.
•
Press the Back button or Forward button to highlight one of the icons.
• Press the Select button to choose the highlighted icon.
E
MODEL 71008 P/N 82358300 Rev.C
For 1 player / Ages 8 and up
INSTRUCTION MANUAL
Power
Button
Directional
Button
Back Button
Select Button
Red Light
(showing
Power “on”)
Menu
Button
Reset
Button
Forward
Button
TM
1
2
3
Sliding Tabs